
Your car’s running rough, the check engine light’s on, and your mechanic just quoted you $300+ to replace something called a VVT solenoid, which belongs to the solenoid valve. Sound familiar? Before you shell out big money, let’s figure out if your variable valve timing solenoid is bad. Testing it yourself is easier than you think, and we’ll show you exactly how to do it.
At FridayParts, we’ve helped countless customers diagnose VVT solenoid problems. The good news? You can test these solenoids with basic tools most people already have. No fancy equipment needed – just a multimeter and some patience.
What Does a Variable Valve Timing Solenoid Do?
Before we dive into testing, let’s quickly understand what this part does. Your variable valve timing solenoid is like a gatekeeper for oil flow. It controls when and how much oil flows to your engine’s VVT system, which adjusts valve timing for better performance and fuel economy.
When you hit the gas, your engine computer tells the VVT solenoid to adjust oil flow. This changes your valve timing on the fly, giving you more power when you need it and better gas mileage when you’re cruising. Pretty clever, right?
When this solenoid goes bad, your engine loses this flexibility. You might notice rough idling, poor acceleration, or terrible gas mileage. Your check engine light usually comes on too, often with codes P0010, P0011, P0012, or P0013.
Signs Your Variable Valve Timing Solenoid Might Be Bad
How do you know if you should test your VVT solenoid? Watch for these warning signs that often point to solenoid problems:
Engine performance issues are usually the first thing you’ll notice. Your engine might idle roughly, like it’s missing a cylinder. Acceleration feels sluggish, especially from a stop. You might hear rattling or knocking noises during startup – that’s your VVT system struggling without proper oil control.
Poor fuel economy hits your wallet directly. When your VVT system can’t optimize valve timing, your engine runs less efficiently. We’re talking about losing 2-5 MPG in some cases. If you’re suddenly filling up more often with no change in driving habits, your VVT solenoid could be the culprit.
Check engine light and codes are your car’s way of crying for help. Modern engines monitor VVT operation constantly. When the solenoid doesn’t respond correctly, specific trouble codes get stored. A basic code reader (about $30 at any auto parts store) can tell you if VVT codes are present.
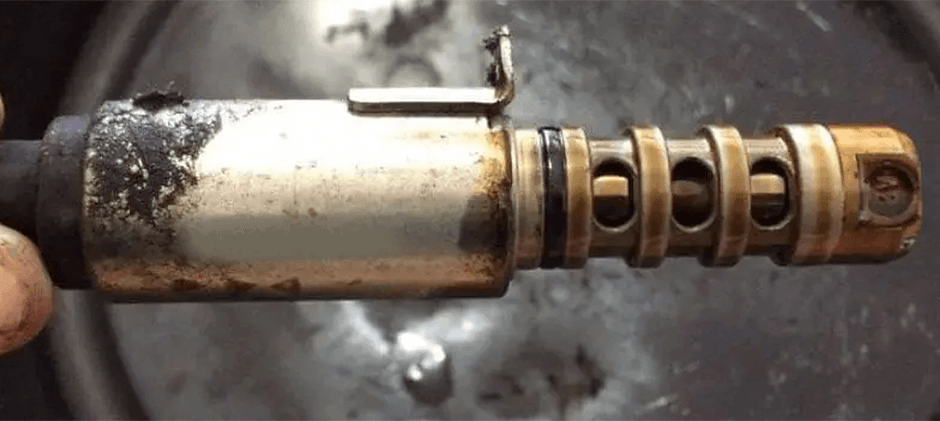
Test 1: Visual Inspection
Let’s start with the simplest test – just looking at the solenoid. You’d be surprised how often visual inspection reveals the problem. Pop your hood and locate your VVT solenoid (check your manual or search online for your specific car model).
First, check the electrical connector. Is it plugged in firmly? Look for bent pins, corrosion, or melted plastic. Wiggle the connector – it shouldn’t be loose. Sometimes, a poor connection causes all your problems. We’ve seen cars “fixed” just by cleaning connector pins with electrical contact cleaner.
Next, examine the solenoid body itself. Look for oil leaks around the solenoid. These solenoids have internal seals that can fail, causing external leaks. Also check for physical damage – cracks, dents, or signs of overheating. If oil is pooling around the solenoid, you’ve found at least part of your problem.
Don’t forget to inspect the wiring harness leading to the solenoid. Look for chewed wires (rodents love them), melted insulation, or obvious breaks. Gently bend the wires while looking for cracks in the insulation. Damaged wiring can cause intermittent problems that drive you crazy.
Test 2: Resistance Testing with a Multimeter
Now we’re getting into real diagnostics. This test checks if the solenoid coil is working properly. You’ll need a basic digital multimeter – you can get one for under $20 that’ll work perfectly.
First, disconnect the solenoid’s electrical connector. Set your multimeter to measure resistance (ohms, shown as Ω). Touch the meter’s probes to the two pins inside the solenoid’s connector. You’re measuring the resistance of the electromagnetic coil inside.
What should you see? Most VVT solenoids measure between 5-20 ohms, but check your service manual for the exact specification. If you read infinite resistance (OL on most meters), the coil is broken – replace the solenoid. If you read very low resistance (under 2 ohms), you’ve got an internal short – also, replace the time.
Here’s a pro tip: Test resistance at different temperatures if possible. A solenoid might test fine cold but fail when hot. If you’ve been driving, let the engine cool and test. Then warm up the engine and test again quickly. Temperature-related failures are super common with these solenoids.
Test 3: Power Supply Testing
Your solenoid might be perfect, but if it’s not getting power, it won’t work. This test checks if your car’s computer is trying to control the solenoid. You’ll need your multimeter again, set to measure DC voltage.
With the connector still unplugged, turn your ignition to the “On” position (don’t start the engine). Touch your meter’s black probe to a good ground (any unpainted metal on the engine). Touch the red probe to each pin in the car’s connector (not the solenoid side).
One pin should show battery voltage (around 12 volts). This is the power supply from your car’s fuse box. No voltage? Check the fuse for the VVT system – it might be blown. The fuse location varies by car, but your owner’s manual will tell you which one.
For the other pin, you might see varying voltage or nothing – that’s normal. This pin carries the control signal from your engine computer. Testing this signal gets more complex and usually requires an oscilloscope or an advanced scan tool. But if you’ve got a good power supply and the solenoid tests OK, the problem might be in the computer control.
Test 4: Activation Testing
Here’s a cool test you can do right at home. When VVT solenoids work, they make a clicking sound as they open and close. You can trigger this manually to see if the solenoid’s mechanical parts are moving.
Remove the solenoid from the engine, but leave it connected electrically. Have a friend sit in the car and turn the ignition on (engine off). Now, use a jumper wire to briefly ground the control pin of the solenoid connector. You should hear and feel the solenoid click as it activates.
No click? Either the solenoid is mechanically stuck or electrically dead. Try tapping it gently while activating – sometimes this frees up stuck parts. If it starts clicking after tapping, it’s bad and needs replacement.
Alternative method: If you’re comfortable with basic wiring, you can bench test the solenoid. Apply 12 volts directly to the solenoid’s pins using jumper wires and a battery. You should hear that distinctive click. Just don’t leave power applied for more than a second or two – these solenoids aren’t designed for continuous operation.
Test 5: Oil Pressure and Flow Testing
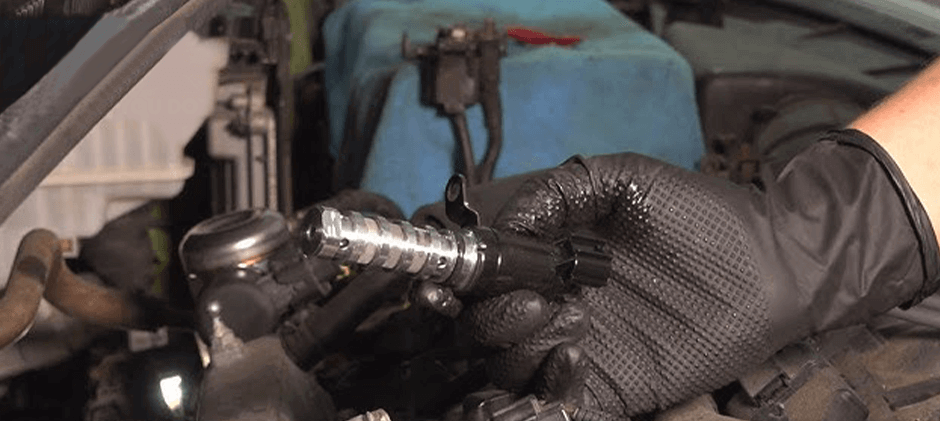
This test is more advanced but super effective. VVT solenoids control oil flow, so testing actual flow tells you if the solenoid is doing its job. You’ll need to remove the solenoid for this one.
First, check the solenoid’s screens. Most VVT solenoids have tiny mesh screens that filter the oil. Pull the solenoid out and look at these screens. Are they clogged with sludge? Even a partially clogged screen prevents proper operation. You can try cleaning with brake cleaner, but heavily sludged screens mean you need a new solenoid.
For the flow test, you’ll need compressed air (carefully regulated to about 30 PSI). With the solenoid removed, blow air through the oil ports while activating the solenoid electrically. When not activated, air shouldn’t flow (or very little). When activated, air should flow freely. This tests if the internal valve is actually moving and sealing properly.
Warning: Some solenoids are normally open, others are normally closed. Check your service manual to know what to expect. Testing backwards will give you confusing results!
Common Testing Mistakes to Avoid
We see people make these mistakes all the time when testing VVT solenoids. Learn from their errors:
Testing with a weak battery gives false results. Your car battery should be fully charged before testing. A weak battery can’t properly activate the solenoid, making a good part test bad. If your battery is questionable, charge it first or use jumper cables to another car.
Ignoring oil condition is a huge mistake. Dirty oil kills VVT solenoids faster than anything else. If your oil looks like black tar or you’re way overdue for an oil change, fix that first. Even a new solenoid won’t last long with contaminated oil.
Not checking for TSBs (Technical Service Bulletins) wastes time and money. Car manufacturers often update solenoid designs or testing procedures. A quick online search for TSBs on your car model might reveal known issues and updated parts. At FridayParts, we always check for updated part numbers before selling VVT solenoids.
When to Replace vs. Clean
Sometimes you can save money by cleaning your VVT solenoid instead of replacing it. Here’s how to decide:
Clean it when: The solenoid tests electrically OK but has dirty screens or sluggish operation. Remove the solenoid and spray it thoroughly with brake cleaner or carburetor cleaner. Work the valve manually if possible. Let it dry completely before reinstalling. This works maybe 30% of the time, but it’s worth trying.
Replace it when: Electrical tests fail, internal seals leak, or cleaning doesn’t help. Also, replace if your solenoid has high mileage (over 100,000 miles) – even if it tests OK now, it’s living on borrowed time. New solenoids aren’t super expensive, and the peace of mind is worth it.
What Do the Test Results Mean?
So you’ve run all these tests – now what? Let’s decode what your results mean:
All tests pass, but you still have problems? Your VVT solenoid might be OK, but other parts could be failing. Check the VVT actuator (cam phaser) itself – these can stick or wear internally. Also, verify oil pressure and quality. Low oil pressure prevents proper VVT operation even with a perfect solenoid.
Intermittent test results? This usually means the solenoid is on its way out. Temperature changes, vibration, or electrical load can push a marginal solenoid over the edge. Don’t wait for complete failure – intermittent problems only get worse.
Are multiple solenoids testing bad? (On engines with multiple VVT solenoids) This often points to oil problems rather than coincidental solenoid failures. Check oil level, pressure, and condition. Consider an engine flush if sludge is present.
What are some Professional Testing Tools
While you can diagnose most VVT solenoid problems with basic tools, professionals use some fancier equipment that gives more detailed results:
Oscilloscopes show the actual control signal from the engine computer. This wavy line tells you if the computer is trying to vary the solenoid’s operation or just turning it on/off. Scope testing reveals computer strategy problems that basic testing misses.
Bidirectional scan tools let you command the solenoid directly through the engine computer. This tests the entire control circuit, not just the solenoid. If the solenoid works with direct battery power but not through scan tool commands, you’ve got wiring or computer issues.
Oil pressure transducers are temporarily installed in place of the solenoid to measure actual oil pressure at that location. Low pressure here explains why even a good solenoid can’t control VVT properly.
How to Prevent Future Variable Valve Timing Solenoid Problems
Once you’ve fixed your VVT solenoid issue, keep it from happening again:
Change oil religiously. Clean oil is the number one factor in VVT solenoid longevity. Follow your manufacturer’s severe service schedule if you do lots of short trips or stop-and-go driving. Consider synthetic oil for better protection.
Use quality oil filters. Cheap filters can’t trap small particles that clog solenoid screens. Spending $3 more on a good filter protects your entire VVT system.
Address problems quickly. If your check engine light comes on with VVT codes, don’t ignore it. Running with a bad solenoid can damage the expensive VVT actuators. A 75-solenoid problem can turn into a 1,000 repair if neglected.
Conclusion
Testing your variable valve timing solenoid doesn’t require an engineering degree or expensive tools. With a basic multimeter and these test procedures, you can diagnose problems like a pro. Most tests take just minutes, and you’ll know exactly what’s wrong instead of guessing.
Remember, these solenoids are wear items – they won’t last forever. But catching problems early through testing saves money and prevents bigger issues. Whether you fix it yourself or arm yourself with knowledge before visiting a shop, testing puts you in control.
At FridayParts, we believe in empowering car owners with real diagnostic knowledge. These tests have helped thousands of our customers solve VVT problems without breaking the bank. Now you’ve got the same information – time to grab that multimeter and start testing!
Next time that check engine light pops on, you won’t panic. You’ll know exactly how to test your VVT solenoid and make an informed repair decision. That’s the power of DIY knowledge. Happy testing!