
Your tools are your most valuable asset. While some power tools can be expensive. It is equivalent to saving money to extend their longevity. To successfully make it, proper maintenance and thorough cleaning are necessary, which can prevent rust and remove grease. This guide will tell you the simplest and most effective ways and tools to clean your dirty power tools. Learn now and do your job with ease!
When Do You Need to Clean Your Power Tools?
When the signs below appear, clean your power tools:
- After Every Use: A quick wipe-down or blast of air to remove fresh dust and debris is a great habit.
- When Performance Drops: If you notice your drill seems sluggish or your saw isn’t cutting as cleanly, it’s often a sign that dust buildup is causing it to work harder and overheat.
- When It Overheats: If a tool becomes unusually hot to the touch, its ventilation slots are likely clogged. Stop using it immediately and clean it to prevent motor damage.
- When Parts Stick: If a trigger, guard, or adjustment knob becomes stiff, it’s time to clean out the accumulated grime.
What Should You Use to Clean Your Power Tools
Having the right cleaning tools makes the job much easier. You don’t need a lot, but the right tool for the right kind of dirt is key.
Best Thing to Clean Power Tools
Depending on the type of dirt and the tool itself, you will need one or more tools below.
- Vacuum Cleaner: A shop vac with brush and crevice attachments is perfect for sucking dust out of vents and housings.
- Air Compressor: Ideal for blowing stubborn dust out of hard-to-reach areas.
- Brushes and Cloths: A set of stiff-bristled brushes, old toothbrushes, and soft rags is essential for manual cleaning.
- Degreaser: A quality grease-dissolving detergent to tackle oil and lubricant buildup.
- Rust Removers: Sandpaper, steel wool, or a wire brush for handling any surface rust.
- Lubricants and Protectants: Using tool oil or wax, after cleaning, to give the metal surface protection.
- High-Pressure Cleaner: Must use with very much careful, and only on some very certain parts.
Best Ways to Clean Your Power Tools
The method you choose depends on the tool and the type of dirt you’re dealing with. Always unplug your tool or remove the battery before starting any cleaning process.
Using a Vacuum for Fine Dust
A vacuum cleaner can deal with dust from wood or drywall rather than just blowing it around
- Use a crevice tool to get deep into ventilation slots and other small openings.
- A brush attachment is great for gently cleaning the exterior housing without scratching it.
Using an Air Compressor for Packed-In Debris
For dust that’s packed tightly into a motor housing or switch, an air compressor can be more effective than a vacuum.
- Always wear safety glasses, as this will send a cloud of fine particles into the air.
- Use short bursts of air to blow dust out of the vents and away from the tool.
- Work systematically from one side to the other to ensure you get everything out.
Using a High-Pressure Cleaner
CAUTION: This method carries a significant risk and is not suitable for most handheld power tools. Water forced under high pressure can instantly destroy electrical components, bearings, and motors.
- Only use on large, robust equipment or on non-sensitive, removable parts that are confirmed to be water-safe.
- Maintain a safe distance, use a wide-angle nozzle, and ensure the part is completely and thoroughly dry before reassembly.
Basic Cleaning with Simple Tools
For general-purpose cleaning, you don’t need fancy equipment.
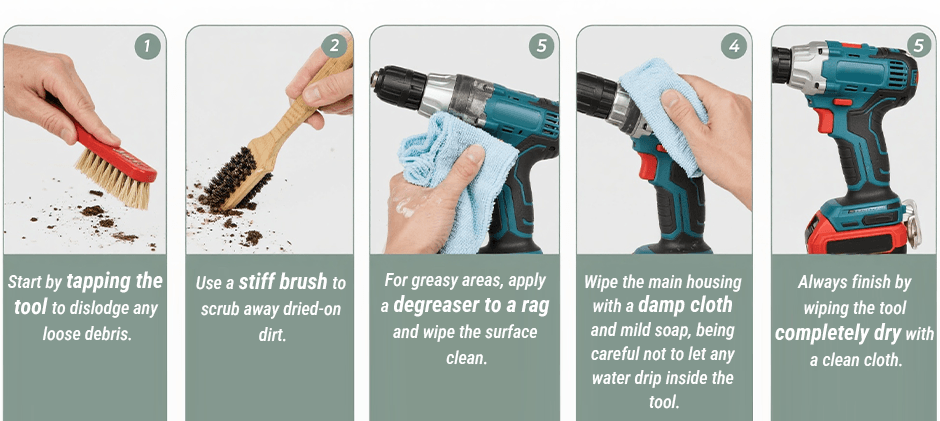
- Start by tapping the tool to dislodge any loose debris.
- Use a stiff brush to scrub away dried-on dirt.
- For greasy areas, apply a degreaser to a rag and wipe the surface clean.
- Wipe the main housing with a damp cloth and mild soap, being careful not to let any water drip inside the tool.
- Always finish by wiping the tool completely dry with a clean cloth.
Why Cleaning Your Power Tools Is Important?
Taking 10 minutes to clean your tools is one of the best investments you can make. Here’s why:
- Prevents Overheating: Cleaning ventilation holes lets air go through to cool the motor in the right way, stopping burnout and making life longer.
- Ensures Safety: The Tool is clean and holding good is a safe tool. Taking away grease stops slipping, and cleaning parts reduces the chance of a short-circuit or fire danger.
- Maintains Function: Dirt and grime can cause moving parts to get stuck and wear out too early. Doing cleaning often makes sure every function is working as it should.
- Extends Tool Lifespan: A Tool that is maintained well can be used for many years, saving you money and the trouble of always replacing.
Power Tool Maintenance and Cleaning Tips
Properly maintaining your power tools is crucial for safety, performance, and longevity. Going beyond a basic wipe-down can dramatically improve your tool’s condition. Here are five key tips that integrate both high-level strategy and specific cleaning techniques.
1. Find Proper Storage
Proper storage is the first line of defense for your power tools from damage. Using the original box or some organized system is better, and putting silica gel small packs inside can absorb too much water and air, making rust less likely to happen.
2. Perform Regular Cleaning
Make it a habit to clean your power tools after each use. Always unplug the tool first, then use a vacuum and compressed air to clear dust from vents, preventing motor overheating. For stubborn grease and oil that can make tools slippery and unsafe, apply a small amount of a grease-dissolving detergent to a clean rag and thoroughly wipe down the affected areas, paying close attention to handles and grips.
3. Conduct Safety Inspections
A routine safety inspection is critical for preventing accidents. Visually check the housing for cracks and inspect power cords for any fraying or damage to avoid serious electrical hazards.
4. Prevent and Remove Rust
Actively protect all metal components from corrosion, as rust is the enemy of any tool. If you spot rust on a saw blade, drill chuck, or other metal surface, gently scrub it away with a wire brush, steel wool, or fine-grit sandpaper. Afterward, apply a thin coat of tool oil or paste wax to the clean, dry surface. This creates a protective barrier against moisture and helps keep moving parts working smoothly.
5. Establish a Maintenance Schedule
Change from waiting for repair after the problem comes, to doing care before trouble happens, by setting up a regular maintenance timetable. This always-same routine of cleaning, checking, and stopping rust can make the tool more reliable, improve performance further, and also make its working life become more longer.
Cleaning Your Power Tools With FridayParts’ Help
Follow this guide, and now you have learnt various methods to clean and maintain your power tools. Try them in the following days! If you come across any problems, turn to FridayParts. Our expert team is here to assist. If you lack any tools for this process, ask for FridayParts. We stock a wide selection of cleaning tools for power tools, including vacuum cleaners, air compressors, Brushes and Cloths, and more.
Don’t let dirty & faulty power tools decrease your working efficiency.