
If your grass looks ragged, torn, or even yellow after mowing, it’s almost never the grass’s fault — your blade is just dull. A dull blade doesn’t cut clean; it rips the grass. That damages it and makes it way more likely to get sick. The fix is easy: put on a sharp new blade. But first, you’ve got to take the old one off. This guide walks you through it step by step. You’ll learn how to remove lawn mower blade.
Preparing to Change Your Lawn Mower Blade
A little prep makes the job way easier—and safer. Grab your tools first and double-check a few things about your mower.
Lawn Mower Blade Removal Tool
Keep everything within reach:
- Socket wrench and right socket size: Most blade bolts are 1/2″, 5/8″, or 9/16″, but check yours. A socket wrench grips better than a regular wrench.
- Thick work gloves: Even a dull blade can cut you. Don’t skip this.
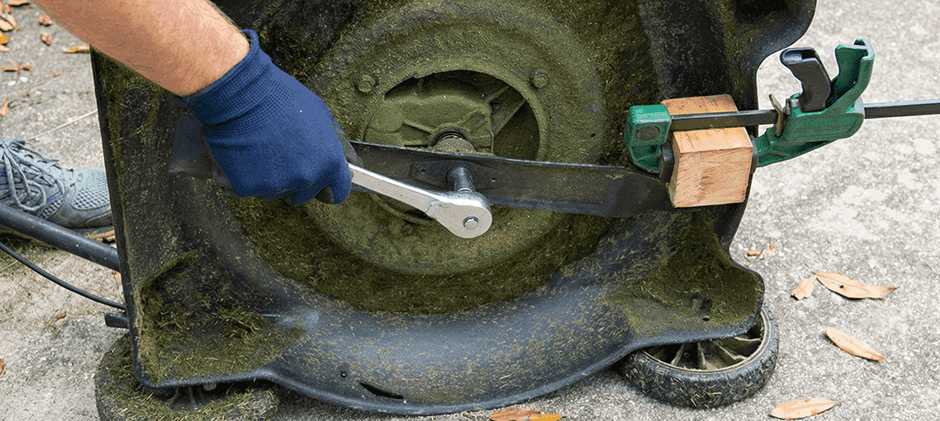
- A block of wood (like a 2×4): Use it to stop the blade from spinning when you loosen the bolt. A clamp works too.
- Penetrating oil (like WD-40): Super helpful if the bolt is rusty or stuck. A quick spray can save a lot of effort.
- A rag or towel: For cleaning off grass, dirt, and grease under the deck.
Check Mower Details
Most mowers are similar, but a few details matter:
- Blade type: Some blades are universal, others have special shapes (like star holes). Take a look or check your manual so you get the right replacement.
- Bolt size: Make sure you know the exact size. Guessing can strip the bolt and make things worse.
- Thread direction: Most bolts follow “left to loosen, right to tighten.” But some mower blades are reverse-threaded, so you actually turn right to loosen. Check your manual to be sure.
Steps to Remove a Lawn Mower Blade
Now that you’ve got your tools ready and know your mower, let’s take off the blade. Follow these steps in order to stay safe and get it done right.
Safety First
If the blade moves suddenly, the engine could accidentally start and hurt you. Make sure it cannot start at all.
- Disconnect the spark plug: Find the spark plug wire, pull it straight off, and move it somewhere it can’t touch the plug by accident. This is the most important safety step.
- Watch out for fuel and oil: You’ll have to tip the mower over. To stop gas from spilling or oil from getting into the engine, either: Run the mower until it’s out of fuel, or Siphon the gas into a safe container.
Tilt the Mower & Get to the Blade
- Tilt it the right way: Always tip the mower so the air filter and carburetor face up. Tilting it the wrong way can make oil leak into those parts — then your mower won’t start and you’ll have a big mess.
- Clean the bottom: Use a rag or brush to wipe off dried grass and dirt around the blade and bolt. This gives you a clear view and keeps debris out of your eyes.
Hold the Blade Still
You cannot loosen the bolt if the whole blade spins with your wrench. Stick a 2×4 piece of wood between the blade and the mower deck. This locks the blade in place so you can turn the bolt without it moving.
Loosen & Take Off the Bolt
Which way to turn? Put the correct socket on the bolt. Normal bolt turns counterclockwise (left) to loosen. The reverse-thread bolt turns clockwise (right) to loosen.
Push firmly and evenly on the wrench. Don’t jerk it — that makes slipping more likely. If it’s really stuck, check tips for stubborn bolts. Once it starts moving, you can unscrew it by hand.
Remove the Blade & Check It
Take off the bolt and washers, then pull off the blade. Remember the orientation. Note which side faces down (toward the grass) and which side faces up.
Many new blades say “This Side Up” or “Grass Side.” The sharp edges must face the direction the blade spins. If installed upside down, the blade won’t cut the grass at all.
How to Loosen an Extremely Tight Blade Bolt?
One of the most common frustrations, especially with newer mowers, is a bolt that feels stuck or “welded” in place. That’s because manufacturers tighten them really hard at the factory for safety. A regular wrench often isn’t enough. The trick here isn’t just muscle — it’s leverage.
Lock the Blade First
Before using extra force, make sure the blade can’t move at all.
- Wood block method: Wedge a 2×4 between the blade and deck.
- Check for a locking hole: Some mowers have a hole near the blade that lines up with the blade or fan. Stick a screwdriver or metal rod through it to lock the blade in place.
Then Get More Leverage
You need a longer lever to make loosening the bolt easier.
- Use a breaker bar: This is a long, non-ratcheting handle made to break loose tight bolts without hurting your tools.
- DIY method: Don’t have a breaker bar? No problem. Put the closed end of your wrench on the bolt, then slide a sturdy metal pipe over the handle. This gives you extra mechanical advantage.
With the blade locked and your lever in place, apply slow, steady pressure in the correct direction.
Caution: Some bolts are tightened extremely hard at the factory. Don’t jerk or slam on the wrench — sudden force can damage the blade mount. Slow, controlled pressure is always safer and more effective.
What to Do If the Blade Is Stuck After Removing the Bolt?
Sometimes you’ve managed to remove the bolt, but the blade just won’t come off. This is common for almost the same reason: dirt buildup. Long-term accumulation of grass clippings, mud, and moisture hardens, acting like cement, keeping the blade firmly “sticking” to the spindle.
Don’t hit it with a hammer. Just press the following method to remove the blade step by step.
- Spray penetrating oil: In the blade mounting position, that is, around the central spindle, spray a sufficient amount of penetrating oil. Wait 10–15 minutes to allow the oil to penetrate and soften the dirt.
- Tap gently: Using a hammer or rubber mallet, tap gently a few times near the center of the blade, taking care to alternate between the two sides. These vibrations often loosen the blade. You can also try tapping the ends of the blade and rocking it back and forth.
- Pry carefully: If tapping is not enough, you can use a small pry bar for leverage. Tuck the tip of the pry bar between the blade and a sturdy blade mount or deck (never pry a plastic fan!) Gently pry upwards, then rotate the blade and try again from another angle.
When to Sharpen vs. When to Replace?
After the blade is removed, decide whether to sharpen it or replace it.
Sharpening: The blade is just a little dull.
Replacement: If any of the following occurs, replace it with a new one:
- Large chips, gouges, or deep grooves caused by hitting rocks or tree roots
- Any visible cracks, even small ones — do not use
- The blade is bent or worn so much that too much metal is lost, causing imbalance, which can make the mower vibrate or even damage the engine
A new blade not only cuts neater, but also reduces wear and tear on the mower, allowing it to last longer.
Upgrade Your Cut with the Right Parts
Keep your lawn mower blades sharp for good mowing. Taking the blade off might sound hard, but just follow the steps and it’ll be easy. If the blade’s too worn to sharpen, just replace it. FridayParts has all kinds of mower blades—you can find ones that last long and don’t cost much. Get your mower cutting clean and nice again now!