
Have you ever experienced a stuck oil filter during a routine oil change? The filter is welded in place under high pressure and heat, making it impossible to remove, making this simple maintenance task difficult. However, there are proven solutions to this problem. This guide will explain the causes of a stuck filter and the best techniques for easily removing the oil filter canister, helping you prevent this from happening again.
Why You Need to Remove a Stuck Oil Filter?
Before you get into the “how,” let’s quickly cover the “why.” It can be tempting to just drain the old oil and skip a difficult filter change, but this is a catastrophic mistake for a heavy-duty engine.
The oil filter’s job is to capture harmful contaminants circulating in your engine oil—things like microscopic metal shavings from wear, soot from combustion, and dirt that gets past seals. Over time, the filter media becomes saturated and clogged with this debris.
When an oil filter clogs, a component called a bypass valve opens. This is a safety feature designed to prevent oil starvation, but it means that from that point on, your engine is being lubricated with unfiltered, dirty oil. This abrasive slurry will dramatically accelerate wear on critical, high-cost components like:
- Crankshaft and camshaft bearings
- Piston rings and cylinder walls
- Turbocharger bearings
In short, a single skipped filter change can cause thousands of dollars in engine damage. The old filter must come off.
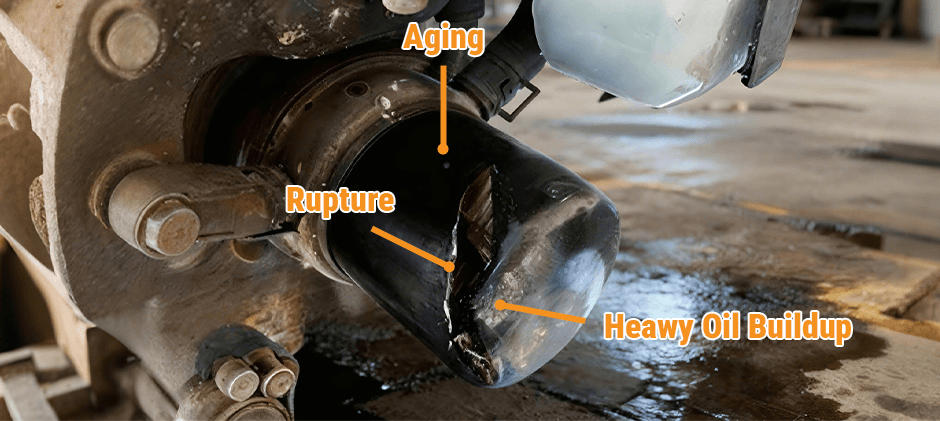
The Cause of a Stuck Oil Filter
Before grabbing your wrench, it helps to know why the filter seized in the first place. Common causes include overtightening during the last installation, heat expansion between the steel filter housing and the aluminum engine block, and dried-out gaskets that have bonded to the surface. In dusty or heavy-duty environments, grime and corrosion can also lock the filter in place. Recognizing these conditions early allows technicians to use preventive maintenance—like routine cleaning and proper lubrication—to avoid filter seizure altogether.
Why Your Grip Isn’t Enough?
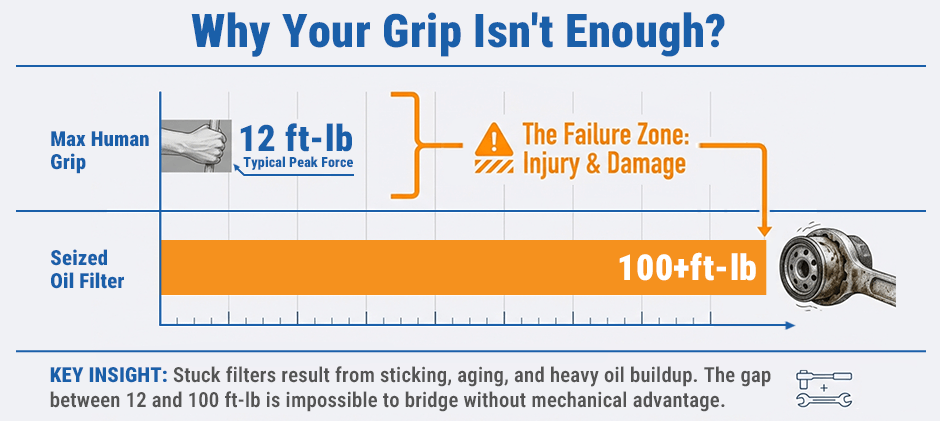
Before you even reach for the filter, it’s crucial to understand the force you’re up against. Here’s the reality check: the average human grip can only generate about 12 ft-lb of torque. A filter seized by heat, pressure, and a dried-out gasket can demand over 100 ft-lb to break loose. This isn’t a battle of strength; it’s a problem of mechanical advantage. The right tool doesn’t just make the job easier—it makes it possible. Professional methods involve selecting a specific tool for the job, whether it’s a heavy-duty wrench that bites into a stubborn metal canister or a non-marring strap wrench designed to protect a fragile plastic housing. The following methods will guide you in choosing the right approach for your specific situation.
How to Remove a Stuck Oil Filter?
When an oil filter is seized, you need a systematic approach that starts with the right tools and escalates as needed. Here are the methods, from least to most destructive.
SAFETY FIRST: Always work on a cool engine. Hot engine oil can cause severe burns. Wear heavy-duty gloves and safety glasses, and make sure you have a large drain pan positioned under the filter, as spills are inevitable.
Method 1: Use the Right Wrench with Proper Technique
Tools you need to remove a stuck oil filter:
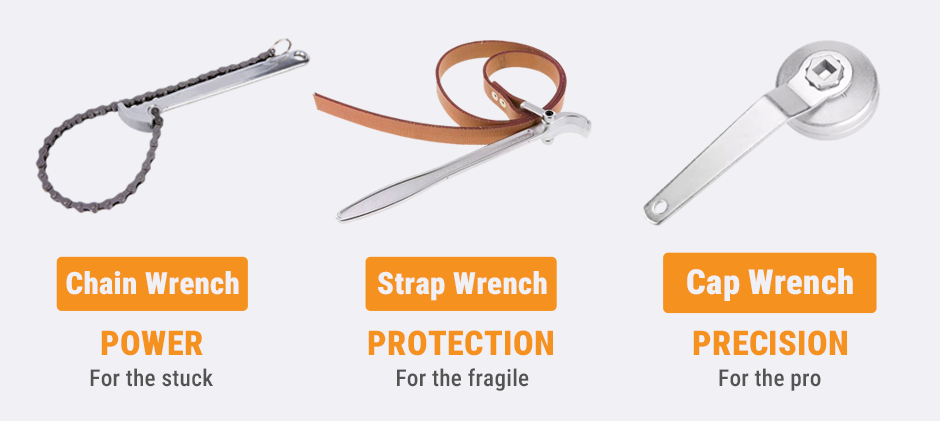
- Heavy-Duty Chain Wrench: A workhorse in any heavy equipment shop. A loop of chain is wrapped around the filter body and tightened, providing an immense gripping force. This is excellent for the large-diameter filters found on many diesel engines.
- Strap Wrench: This uses a strong nylon or metal band to grip the filter. While effective, it can sometimes slip on an oily or grimy filter.
- Cap Wrench: This is the best starting option. It’s a socket-style wrench that fits perfectly over the fluted end of the filter. This provides the most contact points and is the least likely to crush the filter can. You must have the exact size for your specific oil filter.
- Technique: Once you have the right oil filter wrench, attach it to a long-handled ratchet or breaker bar for maximum leverage. Apply slow, steady pressure in the counter-clockwise direction. Jerky movements can cause the wrench to slip and bust your knuckles.
Reading about these wrenches is one thing, but seeing them in action is another. Each tool has its own strengths—some offer raw power for seized metal filters, while others provide a damage-free grip for plastic housings. To help you decide which wrench is best for your situation, we’ve created a detailed video comparison of three professional-grade filter wrenches. Watch below to see how the chain wrench, strap wrench, and precision cap wrench perform in real-world scenarios.
Method 2: Add Abrasive Grip
If your wrench keeps slipping, you can dramatically increase its bite. Take a piece of coarse-grit sandpaper and wrap it around the filter can with the gritty side facing out. Now, when you put your strap or chain wrench over the sandpaper, it will have a much more secure grip on the filter body.
Method 3: The Screwdriver Method (Destructive)
This is the classic last-ditch effort. Be warned: this method will destroy the filter and create a significant mess. There is no going back once you start.
- Choose Your Weapon: Forget a standard household screwdriver. The canister wall on a heavy-duty oil filter is thick. You need a very large, very strong flathead screwdriver, or better yet, a long piece of steel rod sharpened to a point.
- Position the Puncture: Puncture the filter about two-thirds of the way down from the engine block. You want to be well clear of the threaded mounting plate at the top.
- Drive it Through: Use a hammer to drive the screwdriver completely through the filter, so it comes out the other side.
- Turn: You now have a T-handle. Use this newfound leverage to turn the filter counter-clockwise. The metal can tear. If it does, simply pull the screwdriver out and punch a new hole to get a fresh grip.
Method 4: The Hammer and Chisel Method (Destructive)
This technique uses shock and impact to break the seal.
- Find the Seam: Locate the thick, rolled seam at the very bottom of the oil filter can. This is the strongest part of the canister.
- Create a Ledge: Use a sharp, sturdy chisel and a hammer to create a small notch or ledge on this seam.
- Shock it Loose: Now, angle the chisel against the notch so that when you strike it, you are pushing the filter in the counter-clockwise (loosening) direction. Give the chisel several sharp, firm taps with the hammer. Often, these vibrations are enough to break the bond between the gasket and the engine block, allowing you to unscrew it. This is a situation where having a quality hand tool makes all the difference.
How to Prevent an Oil Filter from Getting Stuck?
The best way to deal with a stuck oil filter is to never have one in the first place. Following these three simple steps during installation will save you immense frustration on the next service interval.
- Clean the Mating Surface: Before installing the new filter, use a clean rag to thoroughly wipe the flat mounting surface on the engine block. Remove any old gasket residue, dirt, grime, or rust. This ensures the new gasket can seat perfectly.
- LUBRICATE THE NEW GASKET: This is the single most important step. Dip a gloved finger into a bit of new, clean engine oil and wipe a thin, even film over the entire surface of the new filter’s rubber gasket. This lubrication allows the gasket to compress smoothly for a perfect seal and prevents it from dry-bonding to the hot engine block.
- HAND-TIGHTEN ONLY: This is the rule that is most often broken. Screw the new filter on until the lubricated gasket makes contact with the engine block. Then, tighten it an additional three-quarters (3/4) to one full turn BY HAND ONLY. Do not use a wrench. The engine’s vibration and pressure will keep it secure. Overtightening is the primary cause of stuck filters, as it compresses the gasket and applies excessive force to the threads.
FAQs
Q1: Can I just skip the filter change and only replace the oil?
No. A clogged filter will force dirty, abrasive oil to bypass the filter media and circulate through your engine, causing rapid wear to expensive components. The filter must be changed with the oil.
Q2: What is the best type of oil filter wrench for heavy equipment?
A cap wrench that is the exact size for your filter provides the best grip without damage. For versatility across different machines, a heavy-duty chain wrench is an excellent and powerful choice for large-diameter filters.
Q3: Is it normal for oil to spill everywhere when removing the filter?
Yes, it’s almost impossible to avoid. The filter itself holds a significant amount of oil. Always have a large drain pan underneath, and be prepared with rags to clean up any drips.
Q4: What if I already overtightened my new filter with a wrench?
It’s best to leave it alone. Attempting to loosen and re-tighten it can damage the gasket and cause a leak. Make a note of it and be prepared with the right tools for a tougher removal at your next service.
Get the Right Parts for the Job
A stuck oil filter is annoying, but it’s easy to fix. With the right techniques and proper installation procedures, every oil change can be quick and easy. If you need a high-quality replacement filter or the right tools, look no further than FridayParts. We offer a wide selection of durable parts for all major equipment brands at affordable prices, ensuring you can get back to work with confidence.