
That sinking feeling when you’re knee-deep in a head gasket job and realize you forgot to order new cylinder head bolts – we’ve all been there. At FridayParts, we get calls every week from folks wondering if they can reuse their old head bolts or if they need new ones. The answer isn’t always straightforward, and making the wrong choice can turn a successful repair into a comeback nightmare. Let’s dive into when you can safely reuse cylinder head bolts when you can’t, and how to properly inspect and prepare them if you do.
Cylinder Head Bolt Types: TTY vs Standard
Before you can make any decision about reusing head bolts, you need to know what type you’re dealing with. This isn’t just about saving a few bucks – it’s about understanding the fundamental differences in how these bolts work and why some are one-time-use only.
Standard Cylinder Head Bolts:
Traditional head bolts work like any other bolt – they stretch elastically when torqued and return to their original length when loosened. Think of them like a spring that bounces back. These bolts typically use a torque specification only, like “tighten to 110 ft-lbs in three stages.” Because they work within their elastic range, standard bolts can often be reused if they pass inspection.
Torque-to-Yield (TTY) Bolts:
TTY bolts are a different animal entirely. These bolts are designed to stretch beyond their elastic limit into the plastic deformation zone, permanently elongating to provide more consistent clamping force. The installation usually involves torquing to a specific value, then turning an additional number of degrees (like “torque to 65 ft-lbs, then turn an additional 90 degrees”).
Here’s the critical difference: once a TTY bolt has been stretched into its yield zone, it’s permanently deformed. Reusing it means starting with an already stretched bolt, which can lead to:
- Insufficient clamping force
- Uneven loading across the head
- Premature bolt failure
- Head gasket failure
“I learned this lesson the hard way,” admits one diesel mechanic. “Reused TTY bolts on a Powerstroke because the customer was tight on money. Six months later, I was doing the job again for free, plus eating the cost of a warped head. Never again.”
When Cylinder Head Bolts Should Never Be Reused
Let’s be crystal clear about when reusing head bolts is off the table. Some situations make bolt replacement mandatory, regardless of type or condition. Knowing these scenarios can save you from expensive comebacks and angry customers.
Never Reuse TTY Bolts – Period
This bears repeating because it’s so critical. If your engine uses torque-to-yield bolts, new ones are not optional – they’re mandatory. How do you know if you have TTY bolts?
- The service manual specifies angle tightening after torque
- Bolts have a narrow shank or necked-down area
- The manufacturer specifically states, “Do not reuse.”
- Common on most engines built after 1990
Other Automatic Disqualifiers:
- Visible damage: Any nicks, gouges, or deformation
- Corrosion: Rust or pitting on threads or shank
- Previous overheating: The Engine that overheated may have overstressed bolts
- Unknown history: If you don’t know the bolt’s past, don’t risk it
- High-performance applications: The cost of failure isn’t worth the savings
- Aluminum heads: Less forgiving of clamping force variations
Manufacturer Requirements:
Some manufacturers explicitly state to never reuse cylinder head bolts, regardless of type:
- Most Mercedes-Benz diesel
- BMW engines
- Many Cummins applications
- Newer CAT engines
- Ford Powerstroke (varies by year)
“When in doubt, throw them out,” advises a veteran engine builder. “I’ve built thousands of engines, and the only head bolt failures I’ve seen were from reused bolts. New bolts are cheap insurance.”
6 Steps of Inspection Process for Potentially Reusable Cylinder Head Bolts
If you’ve determined your bolts are standard (not TTY) and your manufacturer allows reuse, here’s how to properly inspect them. This isn’t a casual glance – it’s a thorough evaluation that determines if these bolts can safely secure your cylinder head.

Step 1: Initial Visual Inspection
Before cleaning, look for obvious problems:
- Bent or deformed bolts (automatic fail)
- Severe corrosion or pitting
- Damaged threads are visible through dirt
- Signs of previous over-torquing (necking down)
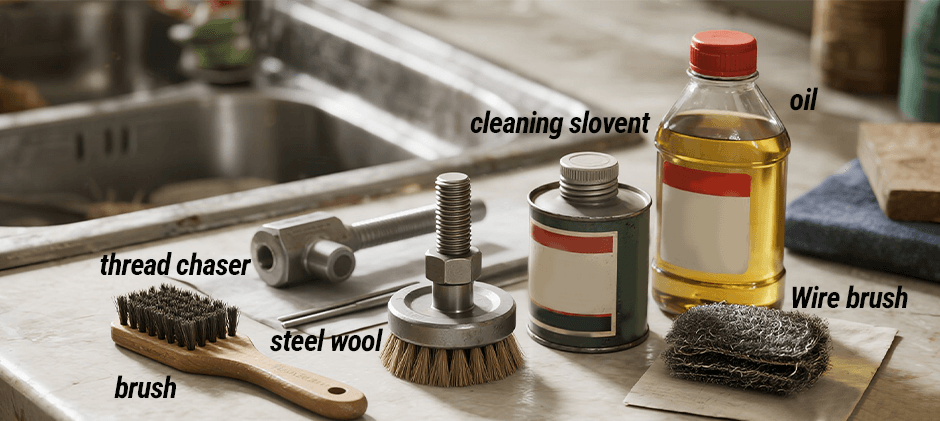
Step 2: Thorough Cleaning
You can’t properly inspect dirty bolts. Clean them using:
- Wire brush for heavy deposits
- Solvent bath to remove oil and debris
- Thread chaser or tap to clean threads
- Compressed air to blow out debris
Step 3: Detailed Thread Inspection
- Check the entire thread length for damage
- Look for stretched, galled, or crossed threads
- Run a thread pitch gauge to verify threads aren’t stretched
- Test fit in a new nut – should thread smoothly by hand
Step 4: Measure for Stretch
This is critical but often skipped:
- Measure overall bolt length with calipers
- Compared to the new bolt specifications
- Any permanent stretch = replacement needed
- Document measurements for your records
Step 5: Check the Shank
- Look for necking (diameter reduction)
- Check for cracks using a dye penetrant
- Verify the shank is straight using a flat surface
- Inspect under head radius for cracks
Step 6: Inspect Bearing Surfaces
- Check the underhead surface for galling
- Look for embedded debris
- Verify the washer (if used) sits flat
- Ensure no deformation of the bearing area
“I spend 30 minutes inspecting a set of head bolts that cost 50 places,” notes one professional.”Some call it overkill, but I call it professional.Myreputationisn′tworth50 to replace,” notes one professional. ”
Proper Cleaning Techniques for Cylinder Head Bolts
Even if your bolts pass initial inspection, they need proper cleaning before being reused. Contamination on bolt threads or bearing surfaces can cause false torque readings, leading to improper clamping force and eventual failure. Here’s how to clean them right.
What You’ll Need:
- Quality parts cleaning solvent
- Wire brushes (brass for aluminum, steel for iron)
- Thread cleaning tap or chase
- Clean, lint-free rags
- Compressed air
- Fresh motor oil
- Torque specifications from the service manual
Cleaning Process:
1. Degrease Thoroughly
Start with a good degreasing:
- Soak bolts in parts cleaner for 15-20 minutes
- Use a brush to agitate and remove stubborn deposits
- Pay special attention to thread roots
- Don’t forget the overhead area
2. Thread Restoration
Clean threads are critical for accurate torque:
- Run a thread chaser through the entire length
- Never use a tap – it cuts new threads
- Clean female threads in the block, too
- Blow out all debris with compressed air
3. Surface Preparation
- Wire brush the shank and the under-head area
- Remove any rust or oxidation
- Polish bearing surfaces with fine steel wool
- Ensure all surfaces are smooth
4. Final Cleaning
- Wash in fresh solvent
- Blow dry with compressed air
- Wipe with a clean, dry rag
- Inspect one more time for missed contamination
5. Corrosion Protection
If not installing immediately:
- light coat of oil on threads
- Store in a clean, dry location
- Keep it in a labeled container
- Re-clean before installation
“The number one cause of cylinder head bolt failure isn’t the bolt – it’s contamination affecting torque,” explains an engine machinist. “Dirty threads can throw off your torque readings by 30% or more.”
Testing Methods to Ensure Bolt Integrity
Visual inspection and cleaning aren’t always enough. Professional shops use additional testing methods to verify bolt integrity. While you might not have all this equipment, understanding these tests helps you make informed decisions.
Dimensional Testing:
The most basic but important test:
- Length measurement: Compare to specifications
- Thread pitch verification: Ensure threads haven’t stretched
- Diameter checks: Look for necking or thinning
- Runout testing: Check for bent bolts
Acceptable tolerances:
- Length: No more than 0.001″ per inch of bolt length
- Diameter: No reduction from the nominal
- Runout: Less than 0.002″ total
Magnetic Particle Inspection:
Reveals cracks invisible to the naked eye:
- Magnetize the bolt
- Apply the iron particle solution
- Cracks show up as particle accumulation
- Most effective on ferrous materials
Dye Penetrant Testing:
Alternative to magnetic testing:
- Clean the bolt thoroughly
- Apply penetrant dye
- Wait for penetration
- The developer reveals cracks as red lines
Ultrasonic Testing:
High-tech option for critical applications:
- Sound waves detect internal flaws
- Can find cracks before they’re visible
- Requires expensive equipment
- Usually, only in specialized shops
Load Testing:
Some shops proof-test bolts:
- Apply the known load in the test fixture
- Measure stretch under load
- Compare to specifications
- Reject if excessive stretch occurs
“We ultrasonically test head bolts for racing engines,” shares a performance engine builder. “For street engines, good visual inspection and measurement usually suffice. But when you’re pushing limits, you need to know for sure.”
Installation Best Practices for Reused Cylinder Head Bolts
If your bolts have passed all inspections and you’ve decided to reuse them, proper installation is critical. Even good bolts can fail if installed incorrectly. Here’s how to do it right.
Pre-Installation Preparation of Cylinder Head Bolts:
1. Verify Clean Threads
- Both bolt and block threads must be spotless
- Run the tap through the block threads one final time
- Blow out with compressed air
- No oil or debris in blind holes
2. Check Thread Engagement
- Bolts should engage at least 1.5 diameter
- Verify the bolt doesn’t bottom out
- Ensure adequate thread contact
- Mark the proper installed depth
3. Lubrication Decisions
This is critical and often done wrong:
- Follow the manufacturer’s specifications exactly
- Some require dry installation
- Others specify engine oil
- Some need special assembly lube
- Wrong lubrication = wrong clamping force
Installation Procedure of Cylinder Head Bolts:
1. Install Finger Tight
- Start all bolts by hand
- Ensure they thread freely
- Don’t force or cross-thread
- Stop when the bolt head contacts the surface
2. Follow Torque Sequence
- Always use the manufacturer’s pattern
- Usually start from the center, work outward
- This ensures an even clamping force
- Mark bolts as you go
3. Progressive Torquing
- Never jump to the final torque
- Typical three-stage process:
1.30-40% of the final torque
2.60-70% of the final torque
3.100% of the final torque
- Allow time between stages for settling
4. Final Verification
- Re-check all bolts in sequence
- Verify none have loosened
- Document final torque values
- Note any anomalies
“I’ve seen more head gasket failures from improper installation than bad parts,” notes a diesel specialist. “Take your time, follow the sequence, and get the torque right. There’s no prize for finishing fast.”
Cost-Benefit Analysis: New vs Reused Bolts
Let’s talk money – because that’s often what drives the reuse decision. However, while saving cash is important, understanding the true cost comparison helps make smarter choices.
New Cylinder Head Bolt Costs:
Standard bolts: $30-100 per set
TTY bolts: $50-150 per set
Performance bolts: $100-300 per set
OEM vs aftermarket: 20-40% price difference
Hidden Costs of Reusing Cylinder Head Bolts:
- Inspection time: 1-2 hours of labor
- Cleaning supplies and tools
- Risk of comeback repairs
- Potential engine damage
- Lost time and reputation
Real-World Scenario:
Let’s say you save $75 reusing head bolts:
- If successful, you saved $75
- If a failure occurs:
Head gasket redo: $1,000-2,500
Possible head damage: $500-1,500
Machine shop costs: $300-800
Lost customer trust: Priceless
When Reuse Makes Sense:
- Low-mileage standard bolts
- Emergency temporary repairs
- Vintage engines with unavailable bolts
- Known history and condition
- Non-critical applications
When New Cylinder Head Bolts Are Smart:
- Any commercial application
- Customer-paid repairs
- High-mileage engines
- Unknown bolt history
- Peace of mind value
“I explain it to customers like insurance,” shares a shop owner. “You can save 75 today or risk spending 75 today or risk spending 75todayorriskspending2,000 tomorrow. So most choose new bolts when they understand the real costs.”
Making the Right Decision for Your Engine
Deciding whether to reuse cylinder head bolts isn’t just about saving money – it’s about understanding the risks, knowing your engine’s requirements, and making an informed decision based on proper inspection and testing. There’s no universal answer that applies to every situation.
At FridayParts, we’ve supplied thousands of head bolt sets over our 16 years in business. We stock both standard and TTY bolts for all major diesel engines – CAT, Cummins, Detroit, Perkins, and more. While we’re happy to sell you new bolts, we’re even happier helping you make the right decision for your specific situation.
Remember these key points:
- TTY bolts are never reusable – no exceptions
- Inspection is critical – shortcuts lead to failures
- Manufacturer specs rule – always check service information
- Clean installation is crucial – contamination causes failures
- Document everything – protect yourself with good records
Whether you’re a professional technician or a dedicated DIYer, the decision to reuse head bolts should never be taken lightly. When in doubt, new bolts are cheap insurance against expensive failures. Because at the end of the day, we all want the same thing – engines that run reliably without comebacks.
Fix it once, fix it right – sometimes that means new bolts, sometimes it means properly inspected and cleaned reused bolts. The key is knowing the difference and making the right choice for each situation.
Need head bolts or gasket sets? FridayParts stocks complete engine rebuild components for all major diesel brands. From individual bolts to complete overhaul kits, we have what you need in stock. Not sure what bolts your engine requires? Our experts are here to help. Visit FridayParts.com – your trusted source for quality diesel parts for over 16 years.