

Check out this 42-inch Troy-Bilt Pony deck spring diagram. It shows exactly where your two key mower‑blade springs sit: the belt tension spring right on the mowing deck, and the PTO cable spring hooked up to your engagement lever. If your mower belt keeps slipping, or the blades just won’t spin at all, you’ve got to know where these springs mount to get your machine fixed. Keep reading to view the full diagrams, learn what each spring does, and walk through simple step‑by‑step replacement instructions.
Understanding the Two Key Springs on 42″ Troy-Bilt Pony Deck
When looking at a 42-inch Troy-Bilt Pony deck spring diagram, many people get confused because they only look for one spring. In reality, there are two completely different but equally vital springs on this mower deck.
- Belt tension spring: This spring mounts directly on the deck itself. Its main job is to keep the right amount of tension on the mower belt at all times.
- PTO (Power Take-Off) cable spring: This spring attaches to the very end of the PTO cable. Its job is to engage the power. When you pull the lever, this spring pulls the pulleys to tighten the belt and make the blades spin. We will look at both of these in detail below.
Belt Tension Spring (Idler Spring) Diagram & Function
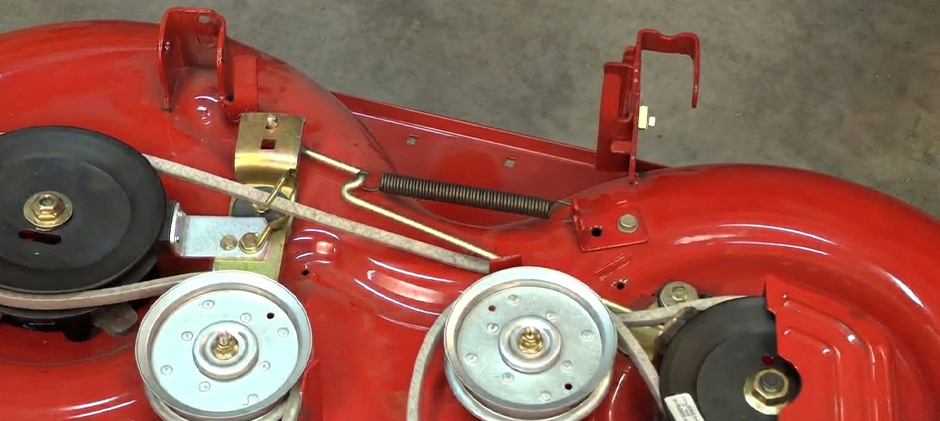
In the first diagram, you can see the exact location of the belt tension spring, also known as the idler spring. One end of this long metal spring hooks into a small hole on a stationary metal bracket welded to the mower deck. The other end hooks into the movable idler pulley arm.
The function of this spring is very clear. It constantly pulls on the idler arm. By doing this, it keeps the mower belt tight against the pulleys. If this spring breaks or gets too old and loose, the belt will slip, and your blades will not cut the grass well.
Additionally, the spring also works like a shock absorber. If your mower blades smack into a rock or a thick tree root, it lets the belt flex slightly. That little bit of give keeps the engine shaft and mower spindles from absorbing the whole impact.
How to Replace the Extension Spring on a Troy-Bilt Pony Lawn Tractor?
Replacing this extension spring is a simple process, but we need to remove the deck from the tractor first to make it easy and safe.
- Lower the deck to its lowest possible position using the deck lift lever. Next, we remove the plastic belt guards and take the belt off the main engine pulley. After that, we remove the metal pins that secure the rear of the deck on both the left and right sides. Then, we remove the front deck attachment point.
- Detach the PTO cable. We remove the small pin that holds the cable in place, pull back on the black cable housing, and unhook the spring from the deck. Now, we can carefully slide the entire deck out from underneath the mower.
- Access to the extension spring. Removing the old spring is straightforward in theory: we just unhook it from the stationary bracket on one side and the wire bend on the other side. However, these springs are very tight. A great trick we use to make this easy is to take a small piece of strong rope. We loop the rope through the hook of the spring and tie a knot. Then, we pull hard on the rope. This gives us the leverage we need to pull the spring off the bracket safely without pinching our fingers.
- We install the new spring using the exact same rope trick. We hook one end of the spring onto the idler arm wire. Then, we loop our rope through the other end, pull the spring back, and slide the hook into the stationary bracket hole. Once it is in place, we just untie or cut the rope.
- Slide the deck back under the mower. We reattach the rear pins, the front attachment point, and the PTO cable. We route the belt back onto the engine pulley and bolt the belt guards back on. That is all it takes to replace the extension spring.
Troy-Bilt Pony Deck Belt Diagram
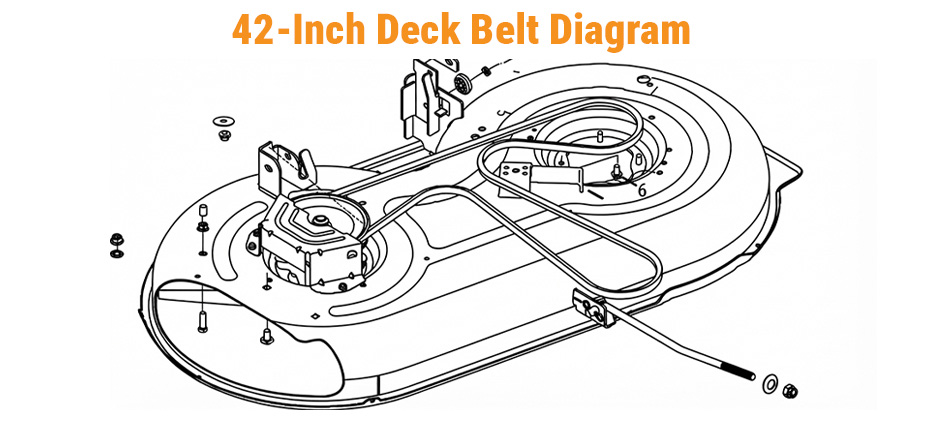
Since we are working with the tension spring, we also need to know how the belt routes around the pulleys. Looking at the 42-inch Troy-Bilt Pony deck spring diagram for the belt, we can see the exact path.
In the middle, the back side of the belt (the flat side, not the V-shaped side) presses against the flat idler pulleys. When the tension spring pulls the idler arm, these flat pulleys push hard against the back of the belt, making the whole system tight. Always make sure the V-side of the belt goes into the V-grooves of the spindle pulleys, and the flat side touches the flat idler pulleys.
PTO Cable Spring Diagram
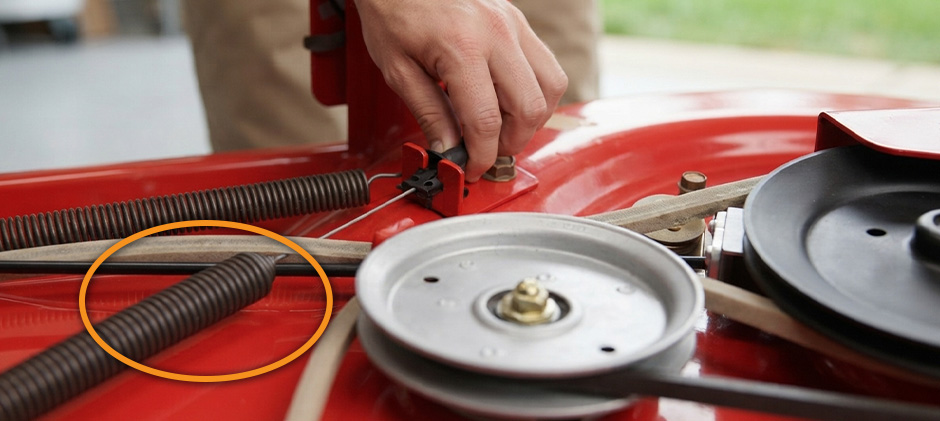
In this diagram, we see a close-up of the PTO cable spring. Unlike the tension spring that sits bare on the deck, this spring is permanently attached to the end of the black PTO cable.
The working mechanism is very direct. When you sit on the tractor and push the PTO lever forward to start mowing, it pulls the metal wire inside the black cable. This wire pulls the thick spring. The spring then pulls on the deck idler pulley bracket. This action tightens the belt and makes the blades spin. The reason there is a spring here, instead of just a solid wire, is to provide a smooth start. The spring stretches slightly when you move the lever, which engages the blades gently rather than snapping the belt violently.
How to Remove the PTO Cable From the Deck?
If your PTO cable breaks or the spring at the end snaps, you will need to remove it. Before doing anything, we always make sure the PTO lever next to the seat is in the “Disengaged” (off) position. If the lever is engaged, the cable will be too tight to remove.
- First, we locate where the black plastic end of the PTO cable clips into the metal bracket on the deck. Holding it in place is a small metal clip called a bow tie clip (or hairpin clip). We use a pair of pliers to grab the loop of the bow tie clip and pull it straight out.
- Once the clip is out, we squeeze the plastic tabs on the cable housing and push the cable backward out of the metal bracket. Now the cable has enough slack. We reach down to the end of the wire and simply unhook the PTO spring from the hole in the idler pulley arm.
- Install your new spring by reversing the steps. Hook the spring into place, push the plastic housing onto the bracket, then slip in the bow‑tie clip to lock it.
Conclusion
A clear 42‑inch Troy‑Bilt Pony mower deck spring diagram makes deck repairs way simpler. Tell the belt tension spring apart from the PTO cable spring, and you can quickly troubleshoot non‑spinning blades and swap out the right part. FridayParts carries a vast inventory with wide compatibility for Troy-Bilt, keeping your mower running.
