

Struggling with your lawnmower engine that surges, screams at high RPMs, or suddenly dies when hitting thick grass? The culprit is almost certainly hiding within your engine’s speed control system. To get your machine running smoothly again, you will need to master your Briggs and Stratton governor linkage diagram and understand how this small but vital metal rod regulates your throttle. But how do you properly align the linkage, and what is the golden rule of governor spring tension that prevents catastrophic engine damage? Let’s dive into the complete setup and adjustment guide to find out.
What Is Briggs and Stratton Governor Linkage?
The governor linkage is a critical mechanism in a Briggs and Stratton engine. Its primary role is to regulate the engine’s throttle automatically, ensuring it runs at a consistent speed regardless of load, especially when you transition from light grass to thick, tall weeds. A standard Briggs and Stratton governor linkage diagram shows a relatively simple setup:
- Linkage Rod: A straight metal rod with short ends slotted at 90-degree angles.
- Governor Arm/Lever: The pivoting metal arm that connects directly to the governor shaft coming out of the engine block.
- Governor Springs: Tension springs that counteract the governor’s internal force.
- Associated Hardware: This includes the idle speed adjustment kit, screws, gaskets, and throttle brackets.
A failing governor often brings about carburetor issues, as the governor system works directly with your fuel delivery setup. If you are currently troubleshooting fuel delivery or cleaning your fuel system, we highly recommend checking out our Briggs and Stratton Carburetor Guide to ensure your entire fuel path is clear.
Briggs and Stratton Governor Linkage Diagram: How Does It Work?
When troubleshooting engine surging or backfiring, the linkage rod itself is rarely the only culprit. Often, the problem lies with improperly set up or stretched springs. This is where a Briggs and Stratton Governor Spring Diagram becomes crucial. Let’s see the diagram below.
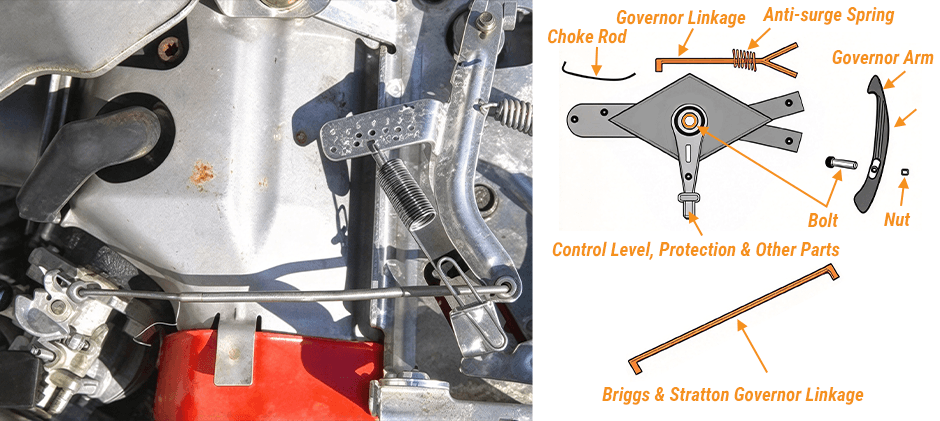
The governor system relies on a delicate balance of forces:
- Governor Mechanism: Pushes the throttle closed as engine speed increases.
- Governor Spring: Pulls the throttle open to increase engine speed.
If these springs are stretched, damaged, or hooked into the wrong holes on the governor arm, your engine will either idle roughly, scream at dangerously high RPMs, or backfire when you try to throttle up.
*Note: The governor system works hand-in-hand with your manual throttle controls. To see how these components connect to your dashboard or handle controls, refer to our detailed Briggs and Stratton throttle linkage diagram.
How to Adjust the Briggs and Stratton Governor Linkage?
If you feel your engine speed is fluctuating or the governor is not responding correctly, you’ll need a governor adjustment. Just follow the steps for an easy process:
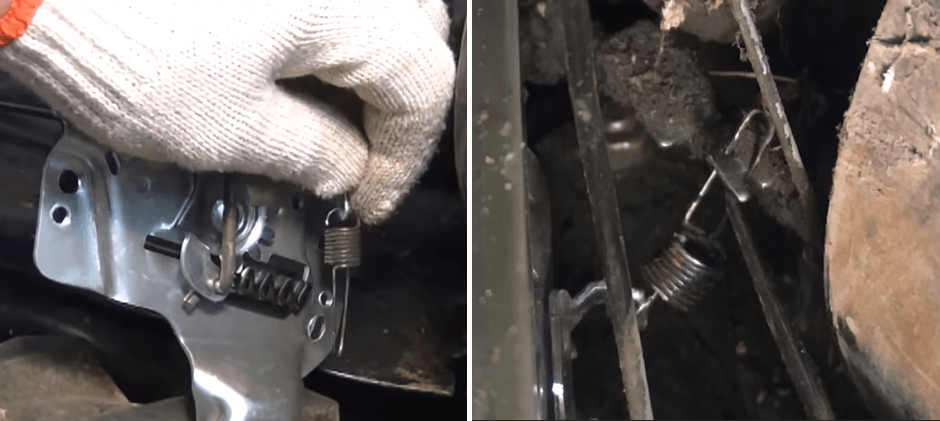
- Locate the Governor Lever and Shaft: Find the governor lever on the side of the engine block. At the bottom of this lever, you will find a clamp screw holding it to the governor crank (the shaft protruding from the engine).
- Loosen the Clamp Screw: Using a screwdriver or socket wrench, loosen the screw on the governor arm just enough so that the arm can rotate independently of the governor shaft.
- Set the Throttle to Wide-Open: Manually push the governor linkage rod so that the carburetor throttle plate is in the wide-open position.
- Turn the Governor Shaft: While holding the throttle plate wide open, use a pair of pliers to turn the governor shaft as far as it will go. For vertical crankshaft engines, turn the shaft counterclockwise; for horizontal crankshaft engines, turn the shaft clockwise. This aligns the internal governor flyweights with the external linkage at wide-open throttle.
- Tighten and Torque: While holding both the lever and shaft in these positions, tighten the clamp screw. For best results, use a torque wrench to tighten the screw to 35 to 45 in-lbs (inch-pounds).
Once tightened, manually move the linkage to ensure there is no binding or restriction. If it moves smoothly, start the engine to test for a consistent, stable speed. The YouTube video clip clearly shows how the choke, throttle & governor linkage is set up on a Briggs & Stratton 4- 5 HP engine.
How to Fix Loose, Damaged, or Missing Governor Linkages?
Over time, constant engine vibration can cause the governor linkage to bend, pop out of its plastic bushings, or lose its tension springs. If you notice your Briggs and Stratton engine is backfiring, surging, or refusing to idle down, a damaged or improperly installed linkage is often the culprit.
Check for Common Linkage Issues
Before replacing any Briggs and Stratton carburetor parts, you can do a quick visual inspection of the assembly:
- Check for Binding: Manually move the governor arm. The linkage rod should slide smoothly without catching on the engine block, carburetor, or air filter housing.
- Look for Bent Rods: The linkage rod must be perfectly straight, with only the factory 90-degree bends at each end. A bent rod alters the distance between the governor and the throttle, causing erratic engine speeds.
- Inspect the Bushings: The tiny plastic retaining bushings that hold the rod in place can wear out or crack, causing excessive play in the linkage.
Linkage Rod and Springs Installation
If you are reassembling the governor system from a pile of loose parts, you should always remember that the governor arm is in its upward, relaxed position; the carburetor throttle plate must be fully open.
- Install the Linkage Rod: Insert the 90-degree bent end of the rod into the carburetor throttle lever, and hook the other end into the corresponding hole on the governor arm.
- Connect the Springs: A typical Briggs & Stratton setup uses two springs. One governor spring connects near the loop end of the linkage (or directly to the governor arm), and a smaller dampening spring runs parallel to the linkage rod to prevent throttle fluttering. Connect these to the moving throttle control bracket.
- Test the Range of Motion: Manually push the governor arm downward. The throttle plate should close completely. When you release it, the governor spring should pull it smoothly back to the wide-open position.
Final Words
A properly adjusted governor linkage is the key to maintaining consistent engine power and preventing costly damage to your outdoor equipment. You can consult a Briggs and Stratton governor linkage diagram to inspect, install and torque your components to the recommended 35 to 45 in-lbs, so that you can easily restore your engine’s performance yourself. If you discover that your springs are stretched, the linkage rod is bent or you need a complete overhaul on your carburetor, head over to FridayParts in no time. We are dedicated to providing a vast range of high-quality replacement parts for your Briggs & Stratton. Explore our catalog now and restore the performance of your Briggs.
Related Reading
Briggs & Stratton Throttle Linkage Diagram: A Complete Guide
Briggs and Stratton Carburetor Diagram: A Complete Guide
How to Find Briggs and Stratton Engine Parts by Serial Number
