

A Craftsman chainsaw fuel line diagram marks out the three key connections. The feed line runs from the fuel filter inside the gas tank to the carburetor. The suction line hooks the carburetor up to the short stem of the primer bulb, and the return line goes from the long stem of the primer bulb back down into the fuel tank. When those old hoses turn brittle and crack, your chainsaw sucks in air instead of gasoline. It just won’t start. We’ll walk you step‑by‑step through how to route and replace these hoses. You can get this issue fixed fast.
Craftsman Chainsaw Fuel Line Diagram
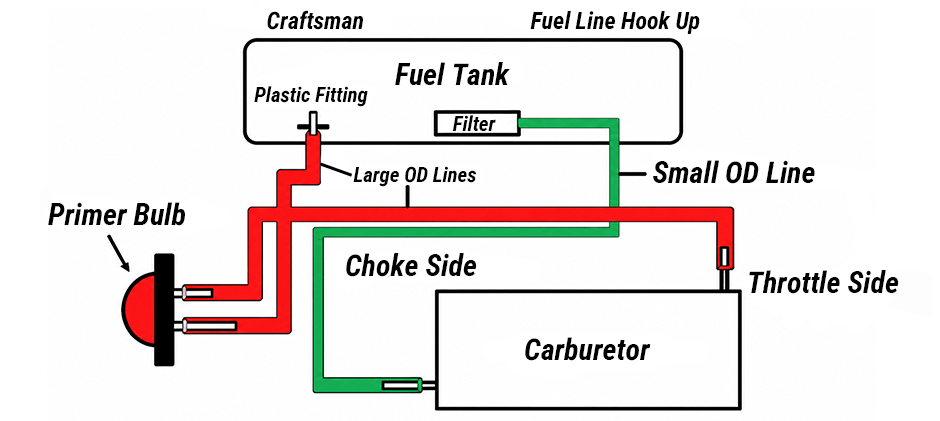
When we look at a standard visual guide for this machine, it is actually a very simple closed loop. The system relies on a specific path to move gas from the tank, into the engine, and back again. If any of these hoses are routed to the wrong spot, the engine will not start because the fuel flow is broken.
The diagram highlights three distinct paths: a feed path, a suction path, and a return path. The green line in our reference often represents the small outer diameter line, which acts as the main feed. The red lines often represent the large outer diameter lines used for the primer bulb circuit. The drawing shows exactly where each hose enters the plastic body of the tank and where it connects to the metal fittings on the engine parts. By following the lines on the drawing, we can clearly see that the system is designed to constantly cycle gas, ensuring the engine always has the exact amount of fuel it needs to run without pulling in empty air.
How to Identify the Craftsman Chainsaw Fuel Lines?
You need to know which line is which before you pull them out.
- Main fuel feed tube. This hose sits inside the fuel tank and has a fuel filter attached to the end of it. It runs from the inside of the tank directly to the main inlet on the carburetor. Its job is to supply clean gas to the engine.
- The hose connects the carburetor to the primer bulb. The tube that connects between the carburetor and motor is likely used to pulse the internal fuel pump. The motor creates a pulse that drives this small fuel pump inside the carburetor, pulling gas up from the tank.
- Return tube. This line connects the primer bulb back to the fuel tank. When you press the primer, it sends excess gas back into the tank through this hose. You will notice that the hoses often have different sizes. Usually, there is a large outer-diameter line and a small outer-diameter line. Matching the right size hose to the right connection is the only way to keep air out of the system.
How to Replace the Fuel Lines on a Craftsman Chainsaw?
Replacing these hoses takes a little bit of patience, but we can do it with basic hand tools. Before we start routing new hoses, we have to clear out the old ones.
- Access the area: We remove the nuts holding the top covers in place. Next, we take off the air filter base plate to expose the carburetor. We also need to remove the choke lever and the rubber grommet that the adjustment tools pass through. At this point, you will likely see that the old hoses are falling apart. Often, when we grab an old hose, it will just crumble into chunks in our fingers. We pull all the old pieces out of the tank and off the plastic fittings.
- Prepare the new hoses: The holes in the gas tank are slightly smaller than the hoses. This size difference creates a tight seal so gas does not leak out. Because the fit is so tight, pushing the new hose through the plastic hole is hard. We cut the end of the new hose at a sharp angle to make a point. Then, we lubricate that pointed end with a few drops of two-cycle engine oil.
- Push the pointed end into the hole in the tank: If it gets stuck, we use a small wire hook or a pair of needle-nose pliers to grab the tip from inside the tank and pull it through. Once we pull enough hose through the filler opening, we cut the angled tip off straight. We always make a flush cut above the spot where the pliers grabbed the hose. Pliers can pinch the rubber and create a weak spot where a hole might start later.
- Attach the new fuel filter to this flush end: We pull the hose back just enough so the filter drops to the bottom of the tank and lies flat. Then route the other end of this feed line to the carburetor. We repeat this fishing process for the return line, pushing it into the tank and connecting the other end to the primer.
How Does the Primer Bulb Work With the Fuel Lines?
Many people think the primer pushes gas into the engine, but it actually does the opposite. The primer pulls the fuel through the carburetor, drawing the air out of the system.
When we press the bulb, the first thing that pumps out of the carburetor is air. As we keep pressing, gas flows up from the tank, fills the carburetor, and enters the bulb. The output of the primer then pushes that gas down the return tube and back into the fuel tank.
To hook this up correctly, we have to look at the back of the primer bulb. There are usually two plastic stems: a long stem and a short stem. The short stem connects to the hose coming from the carburetor. The long stem connects to the return line going back to the tank. If we mix these up, the bulb will not pull gas properly. Any loose connections here will allow air to leak in, and the saw will not be able to run.
How to Check the Fuel Lines After Replacement
After we route all the hoses according to the Craftsman chainsaw fuel line diagram, we must test the system before putting all the covers back on.
- First, we add a little bit of fresh gas to the tank. We press the primer bulb several times. We should see gas moving up the feed line, filling the bulb, and shooting back down the return line. If the bulb stays empty, we know a hose is connected to the wrong spot or there is an air leak.
- Next, we check the physical routing of the hoses. We must make sure we are not pinching or sandwiching any hoses between the carburetor and the intake boot. A pinched hose will block the gas flow completely. We also check the moving parts. We move the throttle linkage and the choke lever back and forth. The hoses must be routed out of the way so they do not block these metal arms from moving freely. Once everything moves smoothly and gas flows without leaks, we can bolt the air filter base plate and covers back onto the saw.
Conclusion
Use the correct Craftsman chainsaw fuel line diagram, and you won’t have to guess your way through repairs. FridayParts keeps plenty of parts in‑stock for different Craftsman models, so you can easily find exactly what you need for your repair job.
