

Uncut strips, torn-up grass, or an uneven cut are often signs that your mower deck isn’t level. How to level a John Deere mower deck? You need to make sure the deck is even from side to side and slightly lower at the front. But which method should you use, and how do you know when the deck is properly level? Keep reading.
Fastest and Easiest Method: Deck Shell Leveling
Lots of John Deere owners have an easy way to level their mower deck, and you don’t even need to measure the blades. This trick is known as deck‑shell or three‑point leveling. It uses the deck frame itself as your measuring guide. It’s quick, you only need a few basic tools, and it works really well if you do it right.
Two Preparation
- Tire pressure: Tires are the basis of a level deck. Wrong air pressure tilts the whole machine, and all your adjustments won’t fix a thing. Look up the correct PSI in your owner’s manual. A typical setup is 14 PSI up front and 10 PSI at the back. Get a good tire gauge and fill the tires to the exact pressure.
- Flat ground: Park the tractor on a perfectly flat spot, such as a garage floor or level concrete driveway. If the ground slopes, you will get wrong readings and mess up your adjustments.
Step-By-Step Guide
Set the deck height to the manufacturer’s recommended leveling position, which is often 2.5 inches. You can do this by raising the deck, turning the adjustment knob, and lowering it back down. At this stage, ensure the anti-scalp wheels are raised fully so they don’t touch the ground and interfere with your measurements.
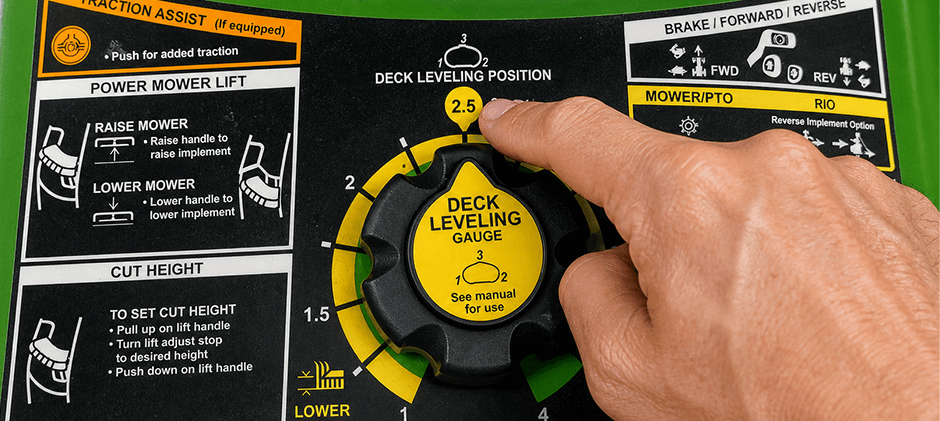
Now, it’s time to measure. Many John Deere models come with a built-in leveling gauge, often found under the seat or integrated into the deck height knob. If you don’t have one, you can easily make one from a block of wood cut to exactly 2.5 inches. You will check the height at three specific points stamped into the deck shell.
- Point 1: Left Rear Edge
- Point 2: Right Rear Edge
- Point 3: Front Center Bracket
1. Level the Deck Side to Side
Slide your gauge under the left rear mark. If it’s jammed tight, that side sits too low. If there’s lots of extra room, it’s too high. Then check the right side. The trick is to make tiny tweaks and keep switching back and forth between the two sides.
Don’t crank one side way up all at once, because that will change the height on the opposite side. Take your time and make small, repeated adjustments. That’s how you get both sides perfectly even.
2. Adjust the Rear Lift Links
Grab a wrench, most often a 17mm size, and turn the nuts on the lift links to raise or lower each side. Spin the nut clockwise to lift the deck, and counter‑clockwise to drop it down. Keep testing with your gauge until it slides just barely under both rear measuring marks.
3. Check and Adjust the Front Bracket
Once the two rear sides match up, move on to the front bracket, which is spot number three. Slide your gauge underneath and check the height. You will usually need an 18mm wrench for this adjustment. Turn the nut up or down until the gauge fits snugly, just like it does at the rear points.
Classic Blade Tip Leveling
If your mower deck has no stamped marks for frame leveling, or you just want the most accurate results, go with the blade‑tip leveling method. This way you measure the actual cutting blades.
Do the same important prep work first: check your tire pressure and park the mower on flat ground. Stay safe — unplug the spark plug wire so the engine cannot start by accident. Wear thick gloves every time you touch the mower blades.
1. Set Cutting Height
Move the mower lift handle to your preferred cutting height. For this example, let’s say we’re aiming for 3.5 inches.
2. Adjust Side-to-Side Level
This step takes the most patience.
- Turn the left blade so it points straight out sideways.
- Use a special leveling tool or just a ruler to measure how far the outer blade tip sits above the ground.
- If the number isn’t 3.5 inches, grab a wrench, usually a 15mm one, and turn the nut on the left lift link to correct the height.
- Next, do the same thing on the right side. Swing the blade sideways, take your measurement, and tweak the right lift link nut until it hits 3.5 inches.
One thing to keep in mind: changing the right side will shift the height on the left a little. You have to go back and recheck the left blade. Keep switching sides and making tiny changes until the heights of both blade tips are within 1/8 inch of each other at your target measurement.
3. Adjust Front-to-Back Pitch
Once both sides are even, set the slight forward tilt.
- Spin one blade so it points straight forward, in line with the tractor.
- Measure the height of the back tip on that blade. It should match your target height, 3.5 inches in our case.
- Then measure the front tip of the very same blade.
- The front tip needs to sit 1/8 to 1/4 inch lower than the back tip. Using our example, the front should measure between 3‑1/4 and 3‑3/8 inches.
If the front is too high, find the adjustment nut on the front draft arm. Turn it counter‑clockwise to drop the front of the deck. Make small changes and keep measuring both blade tips until you get that slight downward angle. This stops the blades from chopping the same grass twice, leaving cleaner cuts and a healthier lawn. After you finish the tilt adjustment, double‑check the side‑to‑side height one last time to make sure nothing moved out of alignment.
Why Should the Front of the Mower Deck Be Lower?
Before we start taking measurements, there’s one key thing you need to know about how mower decks are built. The front of the deck is made to sit a little lower than the back. This slight tilt is called front‑to‑back pitch or rake.
Here’s how it works. As the blade spins, its front edge cuts the grass first. If the deck sat perfectly flat front to back, the back part of the spinning blade would run over the grass it just cut at the same height. This causes double cutting. It wastes more engine power and fuel, and tears up grass tips instead of slicing them neatly. Those ragged, ripped‑up tips turn brown and leave your lawn looking rough and unhealthy.
Drop the front of the deck down by 1/8 to 1/4 inch, and the blade only cuts the grass one clean time. The back edge of the blade then travels safely above the freshly cut grass. You get better fuel and power efficiency, a healthier lawn, and that nice, even, clean‑cut look you want.
How to Check the Deck After Leveling?
You spent time carefully adjusting the deck with your gauge, but you are not done yet. You need to double‑check everything, and there are three easy yet important steps for this final check.
First, Mechanical Check
Go over every adjustment nut you turned on the lift links and front draft arm, and make sure all of them are tight. If your mower has lock nuts, fasten them firmly against the adjustment nuts. This step really matters. Loose bolts are the top reason a newly leveled deck goes out of alignment quickly.
Second, Set Your Anti-Scalp Wheels
These wheels should never rest on the ground when you mow on flat lawns. They only stop the deck from digging into bumps and rough spots. Follow these simple setup tips.
- Park your tractor on flat ground such as a garage floor.
- Lower the deck down to your regular cutting height, for example 3 inches.
- Take a look at the anti-scalp wheels. They need to hang 1/4 to 1/2 inch above the ground.
- Raise or lower every wheel until they all sit at the same height. Remember, these wheels should not hold up any weight from the deck.
Finally, the Test Mow
Your measuring tool gets the settings right on paper, but your grass shows the real result. Pick a small grassy area and mow a few straight lines. After that, shut the mower off and disengage the blades, then safely check the cut. What you want is a neat, even cut without uneven grass heights from one side to the other.
Keep an eye out for thin strips of tall grass left between blades, also known as “mohawks”. If you spot those, the deck is still a little off from side to side. A properly leveled deck leaves your lawn looking like a smooth, even green carpet.
Common John Deere Mower Deck Leveling Problems
Even with a clear guide, you can run into issues. Here are some common problems and how to solve them.
- My Cut is Still Uneven After Leveling: When your deck is perfectly level but the grass looks patchy, something else is causing the trouble. More often than not, you have bent blades from hitting rocks or tree roots, or a worn blade spindle. A bent blade wobbles as it spins and cuts unevenly. A faulty spindle tilts the blade at an odd angle. Take the blades off and lay them on flat ground to check for damage.
- The Deck Won’t Stay Level for Long: If your deck loses its correct alignment soon after you finish adjusting it, look for loose parts. The nuts and bolts on the lift links slowly work loose with use. The lift link pieces could also be worn out and have too much wiggle room. You will need to install new parts in that case.
- Adjustment Nuts are Seized: Rust and dirt can lock these nuts up and make them very hard to turn. Do not force them and strip the edges. Pour on plenty of penetrating oil and wait 15 to 20 minutes before trying again. A six‑point socket grips the nut much better than a 12‑point one and lowers the chance of rounding the nut off.
Winding Up
Getting your John Deere mower deck level is a really useful skill. It keeps your lawn looking great and helps your machine run well. When bent or worn‑out parts make adjustments useless, shop at FridayParts for tough, affordable aftermarket replacement parts.
