
Whether you are a new tractor owner or an experienced one, you may ask:” Why does the PTO appear different than in the manual?” So the “How to remove the PTO shaft” problem becomes urgent and tricky. This guide is here to help you out.
This guide will walk you through every level of PTO shaft removal, from tractor, implement, yoke, gearbox, and more. By knowing different procedures for different situations, you’ll gain the confidence to tackle any job, save time, and avoid costly mistakes.
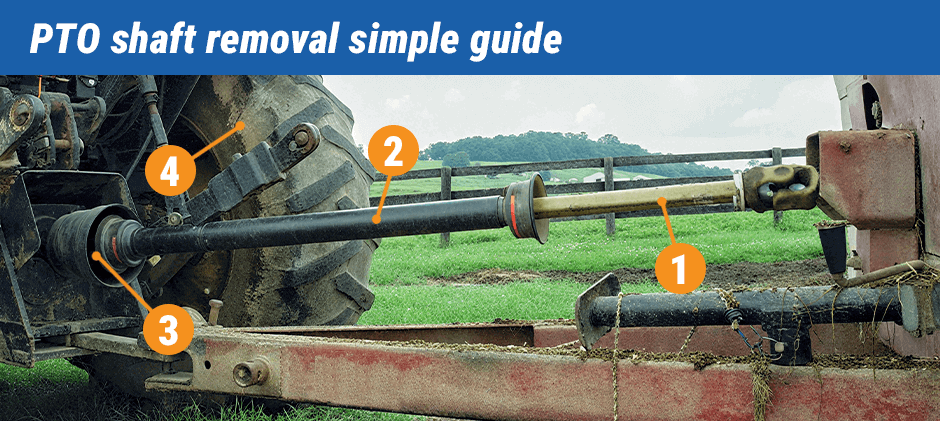
Level 1: Removing the Driveshaft from the Tractor and Implement
When you do this: This is the most common, everyday procedure. You’ll do this whenever you need to switch between attachments (like going from a bush hog to a box scraper) or when storing your equipment.
The Problem it Solves: This answers Bruce’s question directly. The goal is to simply detach the long, external driveshaft that connects the tractor to the implement.
Tools Needed: None, just your hands.
- Safety First: Always start by turning the tractor completely off and removing the key.
- Locate the Locking Collar: As Bruce couldn’t see clearly, the key is to feel for the mechanism. Slide back the plastic safety shield on the end of the shaft connected to the tractor. You will feel a metal ring (collar) or a small, spring-loaded button.
- Depress and Pull: While depressing the pin or pulling back the collar with one hand, use your other hand to firmly pull the shaft assembly toward the rear of the tractor. It will slide right off the splined output stub.
- Repeat on the Implement: The process is identical on the implement side. Disconnect it as well.
Benefit of Knowing This: This is the foundational skill for tractor ownership. Mastering this simple step makes you faster and more efficient at daily tasks, turning a frustrating puzzle into a 30-second job.
Level 2: Removing the PTO Shaft Cover
When you do this: When your plastic safety shield is cracked from sun exposure or an impact, or when you need clear access to the U-joints for greasing or inspection.
Tools Needed: Screwdriver or pry tool, possibly a rubber mallet.
- Remove the End Cones: The plastic cones at each end are typically held on by simple plastic tabs. Gently pry them off to expose the underlying components.
- Identify the Shield Bearings: The main plastic tube spins on its own simple bearings. These are what allow the shield to rotate independently from the shaft.
- Slide the Shield Off: Over time, dirt and grime can make these bearings stick. Gently tap the shield with a rubber mallet to persuade it to slide off the metal shaft tubing. Be careful not to crack the plastic tube.
Benefit of Knowing This: Safety and maintenance. A broken shield is a critical safety failure. Knowing how to replace it is non-negotiable for safe operation. It also makes essential maintenance tasks, like greasing the U-joints, much easier.
FridayParts Solution: Don’t risk operating with a broken guard. We offer a full range of PTO Safety Shields and Cover Kits to keep you protected.
Level 3: Removing a U-Joint from a PTO Shaft Yoke
When you do this: When you hear a clunking, squealing, or feel a vibration from the PTO shaft. This almost always indicates a failed U-joint. This repair saves you from buying a whole new shaft assembly.
Tools Needed: Vise, snap ring pliers, sockets, and a hammer or hydraulic press.
- Remove the Clips: On the inside or outside of the yoke, you’ll find snap rings that hold the U-joint’s bearing caps in place. Use snap ring pliers to remove all four.
- Press Out the Caps: Place the yoke in a vise. Use a socket that is slightly smaller than the bearing cap to press it through the yoke. Use a larger socket on the other side to “catch” the cap as it comes out. This can be done with a strong hammer blow or, preferably, a hydraulic press.
- Remove the Cross: With two caps removed, the U-joint cross can be maneuvered out of the yoke. Repeat for the other half.
Benefit of Knowing This: This is a huge money-saver. A complete driveshaft can be expensive, but a U-joint is a low-cost wear item. This skill empowers you to perform a cost-effective repair instead of a costly replacement.
FridayParts Solution: This job is easy with the right parts. Our Universal Joint Repair Kits include a new cross, four bearing caps, and all the necessary clips.
Level 4: Removing the PTO Assembly from the Tractor Gearbox
When you do this: This is a major mechanical overhaul, not a routine task. You would only do this to service internal components, such as replacing a leaking PTO seal or, as in Don’s case, to gain access to the tractor’s internal hydraulic pump.
The Problem it Solves: Don was stuck because his vintage tractor’s assembly didn’t match his modern repair DVD. He saw a retainer with two flat sides and suspected it unscrewed, but it was actually a press-fit assembly held in by a tight O-ring seal and suction.
Tools Needed: Pry bars, slide hammer or punch, service manual for your specific tractor.
- Confirm the Method: This is the most critical step. As Don discovered, the removal method varies drastically between tractor models. An old Massey Ferguson is different from a new Kubota. Always consult a service manual for your specific tractor model.
- Pry, Don’t Twist: For many press-fit designs like Don’s, the solution is controlled force. As advised on the forum, you insert a strong punch or bar through the hole at the end of the shaft.
- Use Leverage: Use a long pry bar or even a piece of lumber (2×4) to pry against the punch and the tractor’s differential case. This creates the leverage needed to overcome the O-ring’s seal and suction. A few sharp “pops” and the entire assembly will come out.
- Replace Seals While You’re In There: Once the assembly is out, it’s the perfect time to replace the main PTO shaft seal and the retainer O-ring. These are inexpensive parts that prevent future leaks.
Benefit of Knowing This: This knowledge unlocks the ability to perform major repairs on your tractor’s core systems. It separates the parts-changer from the true mechanic and can save you thousands in shop labor fees for jobs like hydraulic pump or seal replacements.
FridayParts Commitment
This is an advanced repair. While we always recommend having a service manual, we are your source for the critical components. We supply the PTO seals, bearings, and O-rings you’ll need to complete the job right and prevent future leaks.
From a simple unhook to a full teardown, knowing these different procedures empowers you to confidently and safely manage your equipment. No matter the level of your repair, FridayParts has the quality components and the expertise to support you. Shop our full collection of PTO parts today! FridayParts can also help you learn further how to maintain your PTO shaft.