
It’s annoying when you plan to mow but only find your John Deere Z425 is failing. Many causes lead to this situation: the blades won’t engage, you turn the key, but it refuses to start, or bypassing the safety switch and the mystery wires. Don’t panic, this guide will carefully introduce how to rewire your PTO switch. Follow us to learn how to diagnose and repair the complex electrical problems on your Z425!
What is a PTO Switch on a Lawn Mower?
Before we diagnose, let’s quickly define this key component. The Power Take-Off (PTO) switch is the command center for your mower deck. Its job is to send an electrical signal to the clutch to engage the blades, but it also acts as a safety hub, checking inputs from the seat and brake switches to prevent accidental engagement.
How to Tell if a PTO Switch is Bad: Key Electrical Symptoms
First, let’s translate your mower‘s symptoms into a diagnosis.
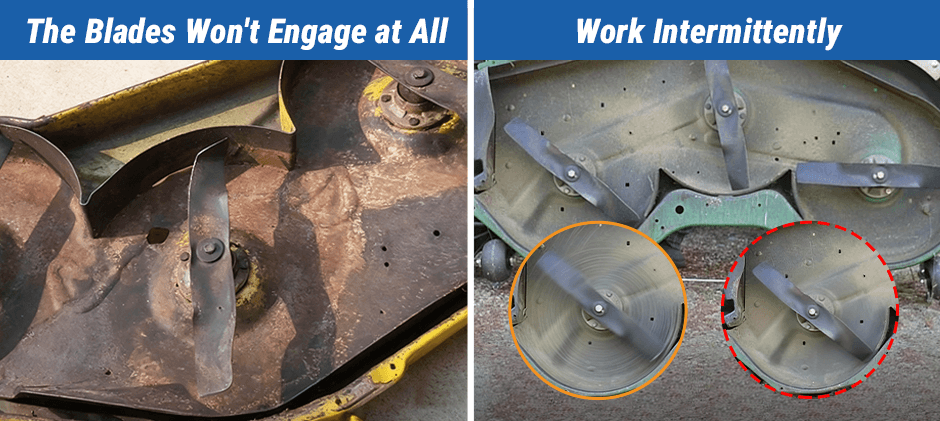
- Symptom 1: The Blades Won’t Engage at All (or Work Intermittently). This is the classic sign of a faulty PTO switch. The switch itself may be worn out, or it’s not receiving power.
- Symptom 2: Engine Cranks But Won’t Start (Or Has Very Weak Spark). This is the most confusing problem. This almost always means the engine’s kill wire is being grounded when it shouldn’t be.
A faulty PTO switch, ignition switch, or other safety component can cause this.
How to Solve the Z425 Electrical Problems
Forget guesswork. Follow this logical diagnostic path to pinpoint the exact source of your problem.
SAFETY FIRST: Park on a level surface, engage the brake, and remove the key. Always disconnect the negative (black) battery terminal before touching any wires.
Part 1: The “Cranks, No-Start” Diagnosis
If your engine turns over but won’t fire up, start here.
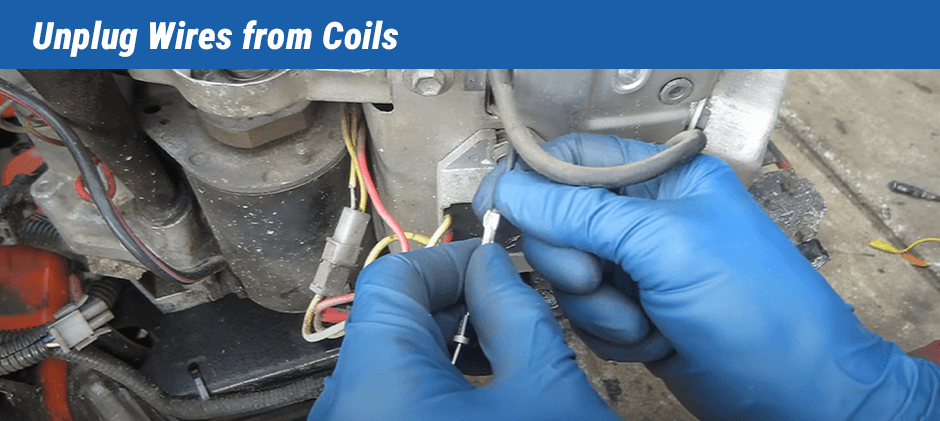
Step 1: The Kill Wire “Smoking Gun” Test
This is the single most important test.
- Access the engine and locate the small “kill wires” connected to each ignition coil.
- Carefully unplug these wires from the coils.
- Attempt to start the engine.
If the engine now starts and runs, you have 100% confirmed the problem is in your mower’s safety or ignition circuit. Something is grounding out your coils. To stop the engine, you will need to carefully reconnect one of the kill wires. Now, proceed to Step 2 to find the source of that ground.
Step 2: Hunting Down the Unwanted Ground
You’ll need a multimeter set to Continuity (the setting that beeps).
- Make sure the kill wires are still disconnected at the engine.
- Clip one multimeter probe to the metal end of one of the kill wires you just unplugged. Clip the other probe to a clean metal spot on the frame (a good ground).
- With the key in the “RUN” position, the multimeter should NOT beep. If it does, you’ve found your culprit. Something in the safety circuit is grounding out when it should be open.
Step 3: Check the Usual Suspects One-by-One
With your multimeter still connected, start disconnecting components (PTO switch, ignition switch, seat switch) to see when the beeping stops. The last part you unplugged is the source of the ground.
Part 2: The “Blades Won’t Engage” Diagnosis
If your engine runs but the blades won’t turn on, the problem is almost certainly the PTO switch or its circuit.
How to Test a PTO Switch with a Multimeter
With the wiring harness disconnected from the switch, use a multimeter set to continuity. It should have continuity between the power-in and clutch-out terminals ONLY when the switch is pulled “ON.” If it fails this test, the switch is bad. If the switch tests good, you need to check if power is getting TO the switch harness.
Warning of “How to Bypass a PTO Switch”
If you’ve discovered bypassed switches on your mower, your priority should be to restore them to their original factory function. Bypassing a seat or brake switch creates a dangerously unpredictable machine and a massive liability. The only safe solution is to find the faulty switch and replace it.
How to Wire a PTO Switch and Replace Components
Once you’ve identified the bad part, the fix is the easy part. While you’re working on the electrical switch, it’s a good time to inspect the mechanical parts. If you ever need to service the mechanical linkage, check out our detailed instructions on How to Remove the PTO Shaft.
- Keep the Battery Disconnected.
- Remove the Old Part: Switches are usually held by plastic tabs. Squeeze them and push the switch out of the dash.
- Install the New Part: Push your new switch into the slot until it clicks.
- Connect the Wiring Harness: Plug the connector firmly into the back of the new switch. It’s designed to fit only one way.
- Reassemble and Test: Reconnect the battery, start the mower, and test all functions—especially the safety features you just restored.
If the previous owner truly made a mess—with multiple cut wires, bad splices, and bypassed components everywhere—your most effective and time-saving solution may be to replace the entire wiring harness. This eliminates all the guesswork and restores your mower’s electrical system to a reliable, factory-fresh state.
Conclusion: From Puzzle to Perfect
By following this guide, from learning what a PTO switch is, identifying if a PTO switch is bad, to solving the problem and replacing the faulty part. You now have a good command of the whole electrical system, which helps you understand deeper what you need and find the right part at once.
Visit FridayParts.com to explore the whole catalog of PTO switches right now! If you have any questions, feel free to contact us, and our expert team will reply within 24 business hours.