

Looking for a Husqvarna deck belt diagram that actually works? Start with the deck size and pulley layout. That’s what stops wrong routing, wrong part orders, and having to pull the deck apart again. Below are the common diagram groups, model matches, quick routing checks, and the belt-related parts worth checking before you reinstall everything.
Match The Diagram First
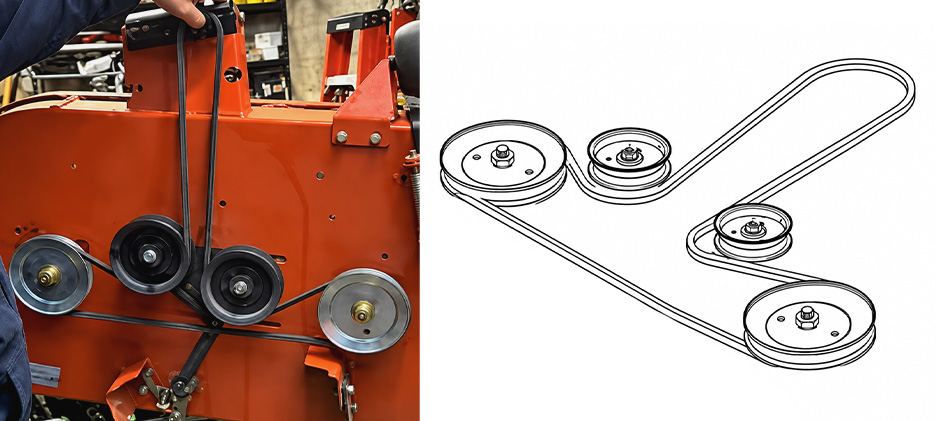
A Husqvarna deck belt diagram only helps if your deck shell, spindle count, and idler layout match. Two tractors can look almost identical yet use a different belt routing.
Before you start on the belt, check these three items:
Deck Size
- 42 inch
- 46 inch
- 48 inch
- 54 inch
Model Number
- YTH18542
- YTH22V46
- YTH24K48
- YTH2348
- LGT2654
- Z248F
Deck Style
- Lawn tractor deck
- Zero-turn deck
- Stamped deck
- Fabricated deck
First thing to know: this diagram only shows the belt path. Belt length and part number vary by deck size and model.
If your old belt is missing or routed wrong, check the spindle positions first, then the idler arm, then the keeper rods. That order usually gets you to the right Husqvarna deck belt diagram faster.
A few related parts are worth checking at the same time:
- deck belt kits
- idler pulleys
- spindle assemblies
- tension springs
If one of these is worn, even the correct routing may not keep the belt in place.
Common Diagram Groups
Most Husqvarna deck belt diagram searches fall into a few routing families. That makes identification easier once you know the deck width.
Diagram 1 For Z248F 48 Inch
This set fits the Husqvarna Z248F along with similar 48-inch zero-turn models.
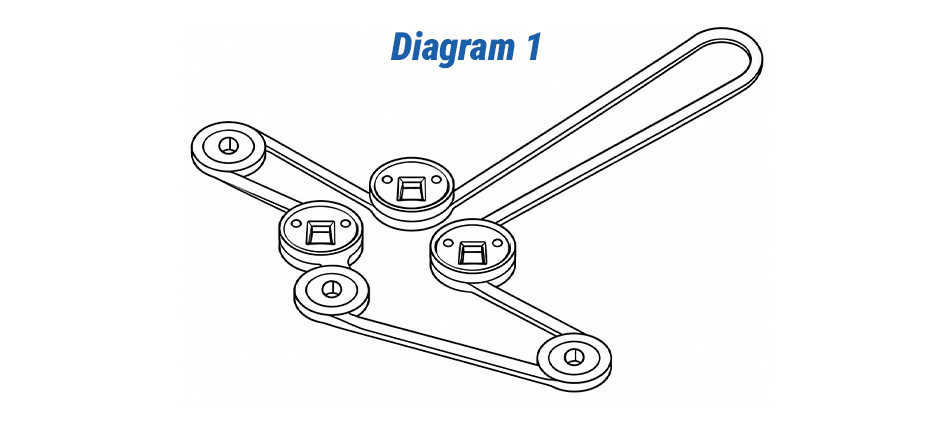
What stands out here:
- Tighter idler routing
- More sensitive keeper placement
- Less room for belt twist during installation
Use the image to confirm pulley direction and belt wrap. Then match the actual belt to the exact deck setup.
Check these parts before reinstalling:
- blade spindle pulleys
- deck idler arms
- belt keepers
When the belt jumps off after engaging the blades, look at the idler travel and keeper clearance first. The belt is rarely the only issue.
Diagram 2 For 48 And 54 Inch Decks
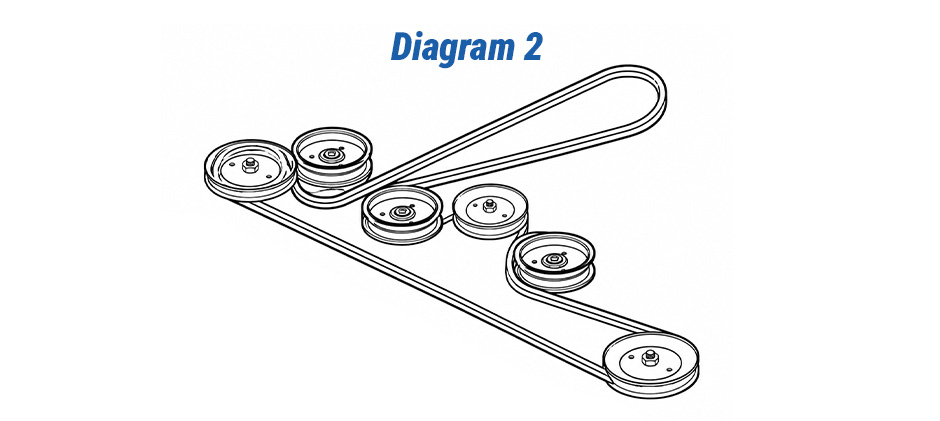
This routing group is common on:
- YTH24K48
- YTH2348
- LGT2654
The routing around the spindle pulleys and idlers is similar across these decks, but the belt size is not the same for every model.
Pay attention to:
- Which side of the idler the belt passes
- Whether the belt sits inside every keeper rod
- How far the spring-loaded arm moves
Helpful parts to review here include mower deck pulleys, mandrel shafts, and deck wheels. A worn pulley can make a new belt look like the wrong part.
Diagram 3 For 42 And 46 Inch Decks
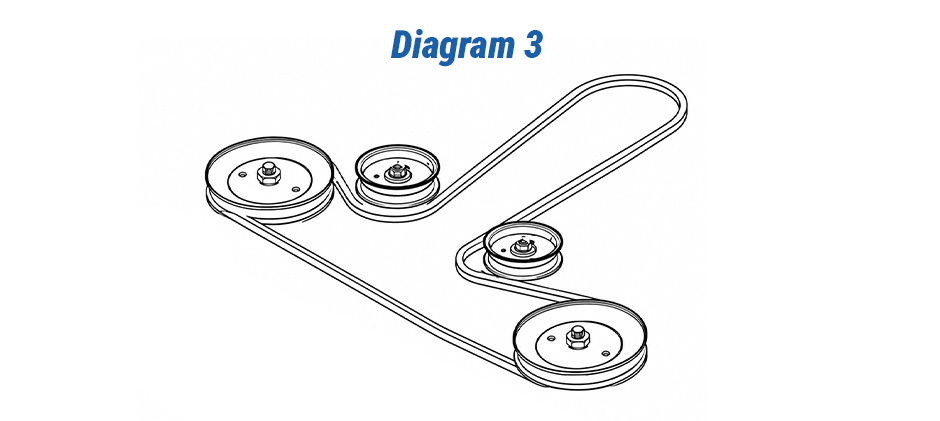
This is the group most people need for:
- YTH18542
- YTH21K46
- YTH22V46
If you need a Husqvarna 46-inch deck belt diagram or a Husqvarna YTH22V46 deck belt diagram, this is often the right starting point.
This layout usually includes:
- Two mandrel pulleys
- One or more idlers
- A spring-loaded tension path
- Keeper rods near the engine to deck handoff
The image helps with routing, but the 42-inch and 46-inch versions do not use the same belt. That is easy to miss when the deck shape looks similar.
Model Chart And Quick Checks
Use this chart to narrow down the right Husqvarna deck belt diagram and the first area to inspect.
| Model | Deck Size | Diagram Group | First Check |
|---|---|---|---|
| YTH18542 | 42 inch | Diagram 3 | Belt length and keeper position |
| YTH21K46 | 46 inch | Diagram 3 | Idler routing |
| YTH22V46 | 46 inch | Diagram 3 | Tension arm travel |
| YTH24K48 | 48 inch | Diagram 2 | Idler side of belt path |
| YTH2348 | 48 inch | Diagram 2 | Pulley wrap |
| LGT2654 | 54 inch | Diagram 2 | Outer spindle path |
| Z248F | 48 inch | Diagram 1 | Zero-turn idler layout |
Even with the chart, one detail still matters most. A 48-inch lawn tractor deck and a 48-inch zero-turn deck do not use the same Husqvarna deck belt diagram.
That’s also why it helps to inspect replacement drive belts, tension springs, and spindle housings together instead of treating the belt as a one-part fix.
Read The Belt Path Correctly
A routing picture is only useful if you read it the right way. Most mistakes happen because the belt is technically on all pulleys, but not on the correct side of each pulley.
Check V Side And Flat Side
Deck belts usually run:
- V side in V groove pulleys
- Flat side against flat idlers
Get that reversed and the belt can squeal, heat up, or roll over.
Check Tension Arm Movement
The idler arm should move freely and return with steady spring pressure. If it sticks, the belt can slip even with the correct Husqvarna deck belt diagram.
Look for:
- stiff pivot points
- weak spring pull
- pulley wobble
- uneven arm travel
This is a good time to look at idler pulleys and spring hardware. Small wear here causes big belt problems later.
Check Keeper Rod Clearance
Keeper rods should control the belt without touching it all the time. A gap that’s too wide lets the belt jump. Too narrow and it wears the belt edge. Hear chirping right after installation? Check the keeper area before removing the belt again.
Signs The Belt Is Routed Wrong
Sometimes the wrong path is obvious. Sometimes it only shows up after a few minutes of mowing. These signs usually point back to routing, tension, or pulley wear.
Watch for:
- Belt twisting during engagement
- One blade slowing down in heavy grass
- Belt riding high in a pulley groove
- Rubber dust on top of the deck
- Frayed belt edges
- Sudden belt slap at startup
If you see any of these, stop and recheck the Husqvarna deck belt diagram against the deck in front of you.
It also helps to inspect related parts such as blade hubs, pulley covers, and deck repair parts. A bent guide or rough bearing can ruin a correctly installed belt very quickly.
Install The Belt Without Guesswork
A patient install typically pays off. If the belt feels too short, don’t force it into position. The issue is often routing or incomplete tension release.
Use this order:
Before Installation
- Park on level ground
- Remove the key
- Lower the deck
- Clean grass from pulley areas
- Spin each pulley by hand
- Compare the deck to the correct diagram
During Installation
- Route the belt around spindle pulleys first
- Leave the tensioned idler for last
- Confirm the V side and flat side
- Make sure the belt passes inside each keeper rod
- Release tension slowly
After Installation
- Rotate the pulleys by hand
- Check that the belt is seated in every groove
- Engage the blades at low throttle
- Listen for scraping or chirping
- Recheck after a short test cut
If the old belt didn’t last long, check the deck spindle bearings, mandrel pulleys, and belt guides too. A new belt won’t fix a worn drive path.
Model Notes That Help In The Garage
Some models have a few patterns worth knowing before you start.
YTH22V46
On the Husqvarna YTH22V46 deck belt diagram, the idler area causes the most mistakes. If the belt seems a little too short, look at whether it’s outside a keeper or if the tension arm hasn’t been fully released.
YTH18542
On the Husqvarna YTH18542 deck belt diagram, confirm the deck tag before ordering. Several 42-inch Husqvarna decks look close, but small pulley layout changes can affect both routing and belt size.
YTH24K48 And YTH2348
These two often share the same routing family. Even so, verify spindle pulley size and keeper position. Matching deck rebuild parts at the same time can save a second repair later.
LGT2654
On the Husqvarna LGT2654 deck belt diagram, the routing looks straightforward. With a 54-inch deck, though, the longer span makes tension problems more obvious. Check the tension springs and flat idlers carefully.
Z248F
With the Husqvarna Z248F deck belt diagram, alignment matters more than on many lawn tractor decks. If the belt comes off during sharp turns or heavy mowing, inspect idler brackets and spindle pulleys before replacing the belt again.
Final Words
Getting the Husqvarna deck belt diagram right is the first step. Making the repair last usually comes down to the condition of the related parts. If it is time to replace belts, pulleys, or spindle items, FridayParts is a practical option for aftermarket parts with good quality, affordable pricing, wide compatibility, and a strong inventory for many equipment brands.
Also Read:
