

Understanding the John Deere carburetor diagram is essential for the carburetor rebuild or adjustment. Usually, a carburetor diagram shows you critical components like the float, fuel bowl, idle jet, needle and choke valve, etc. In this guide, we’ll show you the diagrams for DLTX and TSX carburetors commonly on John Deere tractors and provide complete steps for the carburetor overhaul. Let’s dive in together.
What Are the Types of John Deere Carburetors?
John Deere Carburetor Diagram
Understanding the John Deere carburetor diagram is essential for rebuilding your carburetor or sourcing the correct replacement parts for your carburetor. Below are diagrams for two types of Marvel Schebler carburetors on John Deere tractors.
Diagram for DLTX Carburetor
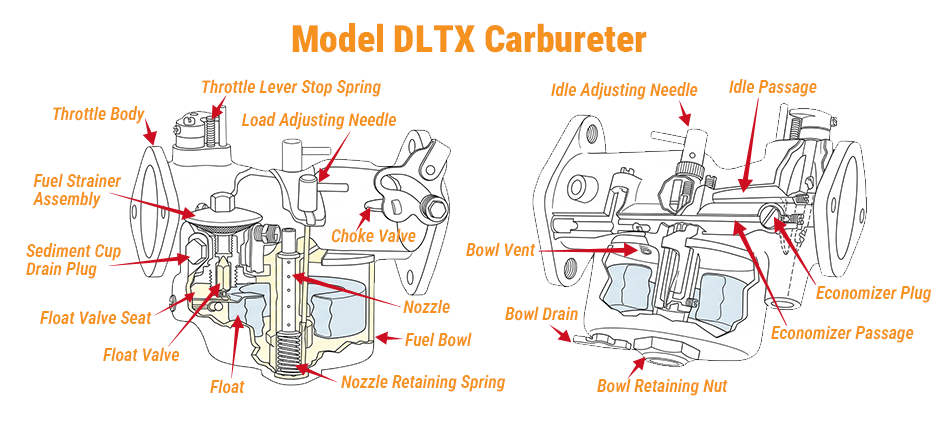
The Model DLTX is a horizontal-type carburetor for John Deere A and B tractors. DLTX carburetors come in various models and their parts are not interchangeable. Common DLTX models for John Deere A and B tractors include DLTX 34, DLTX 46, DLTX 53, and DLTX 71. Each model is for a specific engine with unique jet sizes, float levels, and other settings. Therefore, before ordering any parts, you must always consult your tractor’s service manual for the correct specifications of your carburetor model and identify the exact model number from the tag or stamping on your carburetor’s body.
For example, the DLTX 34 was commonly found on early John Deere A models. The DLTX 46 and 53 were often used on later A models and some B tractors, while the DLTX 71 might appear on later John Deere B tractors. For this reason, to meet the specific engine requirements of the individual tractor on which the carburetor is installed, always use the individual service parts list for that specific model to guarantee compatibility.
Diagram for TSX Carburetor
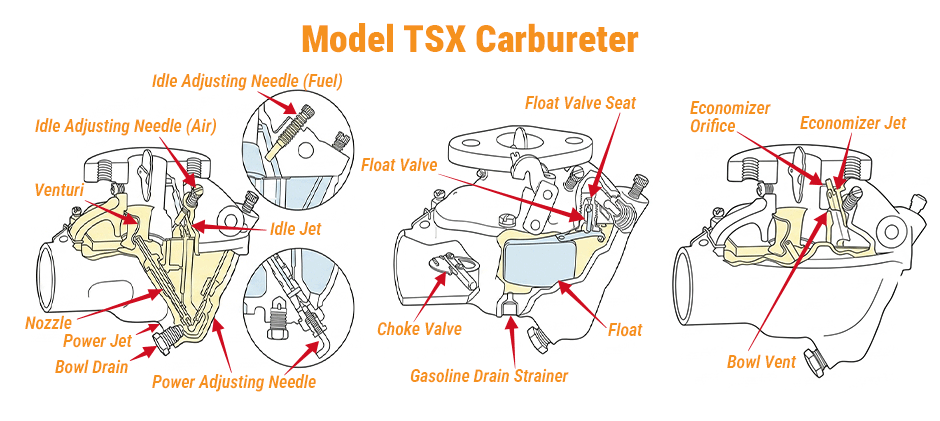
The Model TSX is an updraft-style carburetor for a wide range of smaller and later-model John Deere tractors. TSX carburetors came in numerous models, and while many look similar, their internal components and parts are often not interchangeable. Each model is calibrated with specific venturi sizes, jets, and linkages to match the displacement and fuel requirements of a particular engine.
For example, the TSX245 and TSX530 were commonly found on John Deere M, MT, and 40 series tractors. Later models, like the John Deere 1010 and 300 series industrial tractors, used carburetors such as the TSX809 and TSX904SL, respectively. For this reason, to ensure correct engine performance and guarantee compatibility, always identify the specific model number from the brass tag on the carburetor body and use the individual service parts list for that model when ordering parts.
How to Adjust A John Deere Carburetor?
Step-by-Step Guide for A Complete Overhaul
Removal
- Remove power adjusting needle assembly (Type B)
- Remove bowl cover, screws and lock washers
- Remove float valve, bowl gaskets and venturi
- Remove float valve seat and gasket
- Remove economizer jet (not all carburetors)
- Remove idle jet (not all carburetors)
- Remove idle adjusting needle and spring and replace with new needle if grooved or damaged
- Remove throttle valve, screws, valve and throttle shaft and lever assembly and replace them if there’s excessive looseness between shaft and throttle body
- Remove throttle shaft packing retainer and packing with a small screwdriver or punch
- Remove main nozzle and gasket (Type A, B)
- Remove power jet (Type A, B)
- Remove power adjusting needle assembly or power jet (Type C)
- Remove main nozzle and gasket (Type C)
- Remove retainer plug and gasoline drain strainer (only on carburetors having a curled hair or felt type strainer)
- Remove choke valve screws, valve, choke shaft & lever assembly, choke return spring and choke bracket
- Remove choke shaft packing retainer and packing with small screwdriver or punch
Reinstallation
- Install throttle shaft packing and retainer and insert shaft in carburetor and tap lightly until retainer is flush with casting face
- Install throttle valve with angle identification mark facing flange face of carburetor and tap valve lightly to center in throttle bore
- Install economizer jet and idle jet
- Install idle adjusting needle and spring by setting approximately one turn from seat for preliminary setting
- Install new float valve seat and gasket
- Assemble bowl cover gasket and venturi in casting
- Install float and lever assembly and float lever pin
- Install choke shaft packing retainer and packing
- Install choke bracket, choke return spring, choke shaft and lever assembly, valve and screws
- Install power jet, main nozzle and new gasket (Type A, B)
- Install power adjusting needle assembly (Type C)
- Install gasoline drain strainer & retainer plug with center punch to ensure secure locking
- Assemble castings by inverting throttle body and lower fuel bowl over floats
- Install bowl cover screws and lock washers
- Install power adjusting needle assembly (Type A)
See Related:
- How to Rebuild A Carburetor on Your Riding Lawn Mower?
- How to Replace Carburetor on Lawn Mower?
- How to Clean a Lawn Mower Carburetor?
Wrapping up
Using a John Deere carburetor diagram can facilitate the process of cleaning, rebuilding or replacing your carburetor. Always follow your owner’s manual for specific steps to avoid unexpected damage to the John Deere carburetor. At FridayParts, we are dedicated to providing a vast selection of quality carburetors and John Deere replacement parts, ensuring the optimal performance of your Deere equipment.
