

This guide provides clear John Deere mower deck belt diagram, OEM part numbers, and replacement tips for popular 42″, 48″, and 54″ decks, like D105, D130, D140, L120, and more. We’ll help you find the right information to get your mower back in action quickly.
John Deere 42 inch Mower Deck Belt Diagram
The 42-inch deck is one of the most common sizes, found on many lawn tractors in the 100 series. While models may differ slightly, the belt routing is often identical for models sharing this deck size.
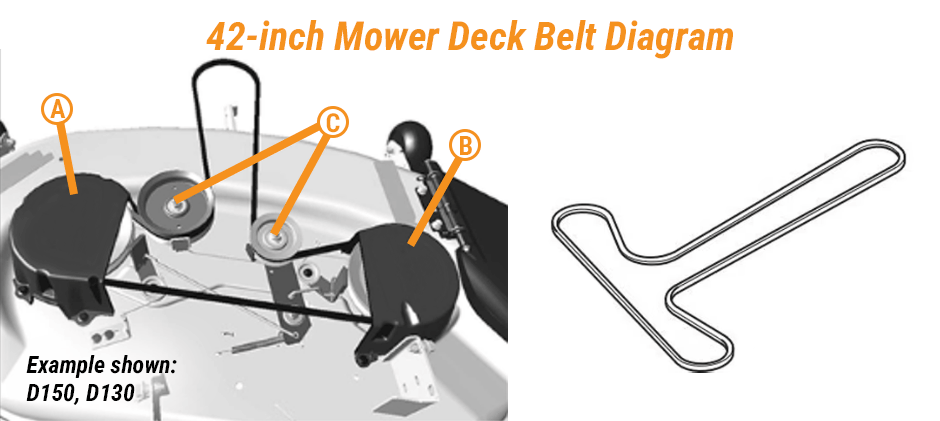
John Deere D105 Belt Diagram & John Deere D130 Belt Diagram
The John Deere D105 and D130 both use the same 42-inch Edge™ Cutting System deck and, therefore, the same belt and routing diagram.
- OEM Part Number: GX20072
- Belt Routing: The belt runs from the engine PTO pulley to the mower deck. It goes around the two blade pulleys (A and B) and the idler pulley (C). Make sure the V-side sits in the grooved pulleys and the flat side rides on the smooth idler pulley.
- Belt Replacement Tips: Belt Replacement Tips: Start by turning off the engine and disengaging the PTO. Use a wrench or breaker bar to move the tensioner arm and take the tension off the belt. Remove the old belt, then check each pulley by hand. They should spin smoothly without noise or wobbling. If a pulley feels rough or loose, replace it before installing the new belt. Route the new GX20072 belt as shown in the diagram, make sure it sits correctly in every pulley groove, and slowly release the tensioner.
John Deere 48 inch Mower Deck Belt Diagram
Moving up in size from the 42-inch deck, the 48-inch deck is a popular choice for those with slightly larger lawns. It offers a wider cut and is found on various lawn tractors and zero-turn mowers.
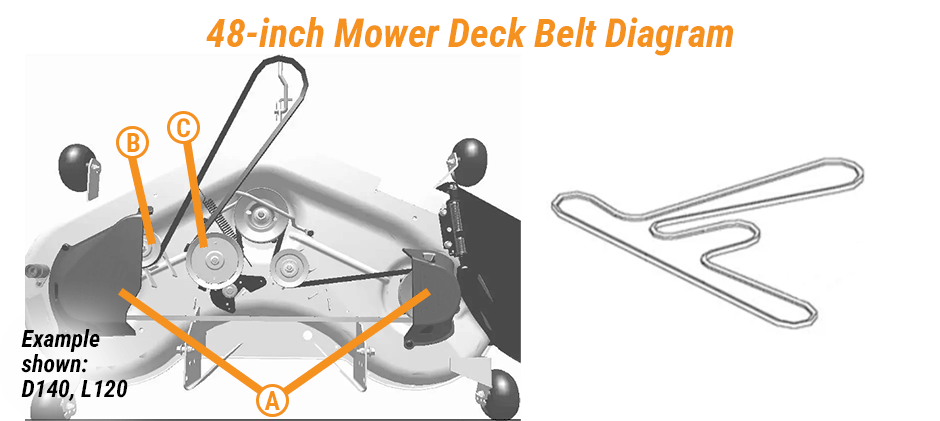
John Deere D140 Belt Diagram & John Deere L120 Belt Diagram
The John Deere D140 and the later-model L120 share a common 48-inch deck design and belt.
- OEM Part Number: GX21833 (This is the current part number and also fits older models that may have originally used GX20305).
- Belt Routing: The belt wraps around the three blade spindle pulleys and is routed through a tensioner arm and a fixed idler pulley to maintain proper tension. Always double-check that the belt is correctly seated in the V-groove of each spindle pulley (A) and routed around the idler pulleys (B and C) as shown in the diagram.
- Belt Replacement Tips: Use a socket wrench or breaker bar to move the tensioner arm and take the tension off the belt. Once the belt is loose, remove it from the pulleys. Before installing the new belt, clean any grass, dirt, and debris from the deck and pulley grooves. Built-up debris can cause the belt to slip, jump off the pulleys, or wear out faster.
John Deere Z225 Belt Diagram
The John Deere Z225 is a zero-turn mower, and its 48-inch deck has a slightly different belt configuration and replacement process.
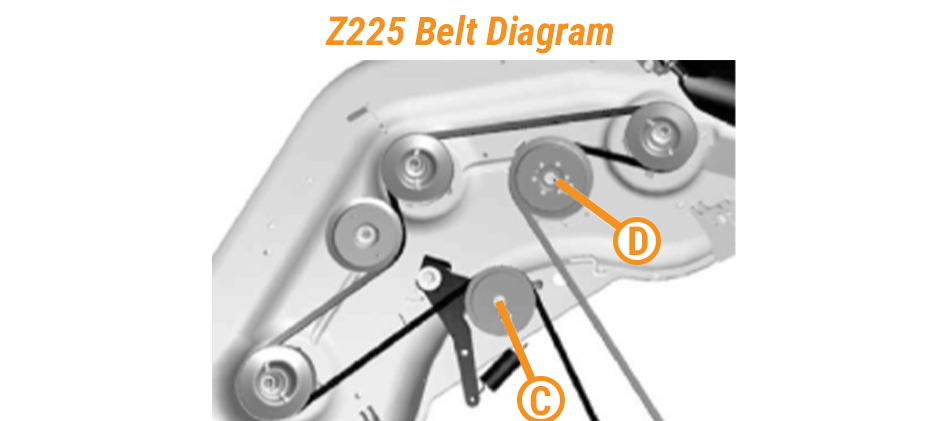
- OEM Part Number: GY20571
- Belt Replacement Steps: The process here is more involved.
- Safety First: Park the mower on a level surface, engage the parking brake, and wait for the engine and muffler to cool completely. We recommend disconnecting the battery for added safety.
- Access the Belt: You will need to remove the belt shields. There are typically several bolts (A) that hold the left and right shields (B) in place. Once removed, you will have a clear view of the belt and pulleys.
- Release Tension: Loosen the nut (C) and bolt (D) on the idler pulleys. This will create the slack needed to remove the old belt.
- Remove and Inspect: Carefully slip the belt off all the pulleys. Inspect it for cracks, fraying, or glazing. Also, check your pulleys and tension arm for smooth operation.
- Install New Belt: Clean the top of the deck thoroughly. Route the new belt as shown in the diagram. A key point of attention is ensuring the belt guide (E) is correctly indexed into its corresponding hole (F) on the tension arm (G). This guide prevents the belt from jumping off during operation. Once routed, re-tighten the idler pulleys and reinstall the belt shields.
Safety Warning: Many of these components are under spring tension. Always wear safety glasses and use appropriate tools when working with tensioner arms and springs to prevent injury.
John Deere 54 inch Mower Deck Belt Diagram
The 54-inch deck is designed for large properties and is often found on higher-end X-series tractors. These decks can feature a more complex dual-belt system: a primary belt from the engine to the deck, and a secondary belt that drives the blades.
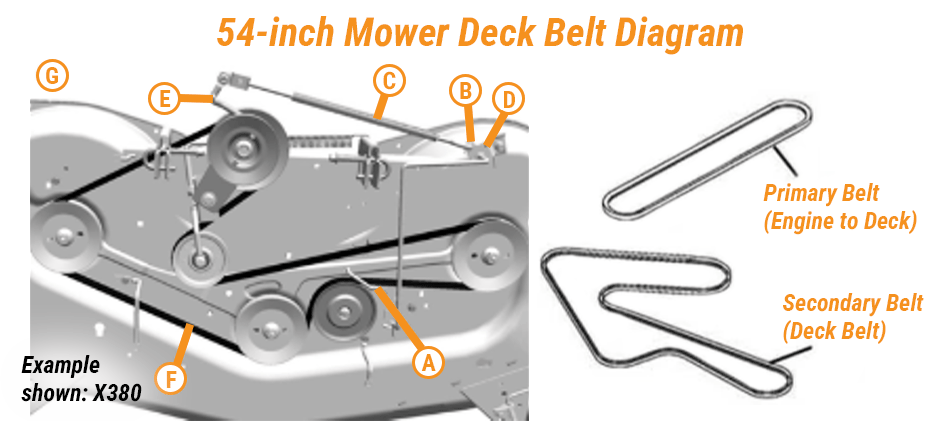
John Deere X380 Belt Diagram
The John Deere X380 with a 54-inch deck is a perfect example of a system with a secondary drive belt. The diagram and instructions below focus on replacing this secondary (deck) belt. OEM Part Number: M169486 (Secondary Deck Belt); M169485(Primary belt)
Replacing the Primary Belt (Engine to Deck)
This belt runs from the engine’s PTO clutch down to the main input pulley on the mower deck. This belt can often be replaced without removing the entire deck, but it requires working underneath the tractor.
- Preparation: Park the tractor on a level surface, engage the parking brake, and allow the engine and muffler to cool completely. Lower the mower deck to its lowest setting.
- Release Drive Belt Tension: Remove the machine and rear deck shields. Locate the long tension rod on the side of the mower deck.
Replacing the Secondary Belt (Deck Belt)
This belt is located entirely on top of the mower deck and is responsible for spinning the three blades. This is an involved replacement that requires removing the deck from the tractor.
- Preparation: Remove the mower deck completely from the tractor to access the secondary belt. This starts with detaching the primary drive belt from the engine PTO.
- Remove Shields: Once the deck is off and on a suitable work surface, remove the various plastic shields covering the pulleys.
- Release Tension: Locate the spring-loaded tensioner assembly. You will need to remove a spring locking pin (B) to detach the tension rod (C) from its bracket (D). This action will release the majority of the tension from the belt.
- Remove the Belt: With the main tension released, you can now rotate the tension arm (E) by hand to create enough slack to walk the secondary belt (F) off all the pulleys.
- Install New Belt: Clean any grass and debris from the deck and pulley grooves. Route the new M169486 belt as shown in the diagram. Make sure it runs under the tension rod (C) and sits correctly in every pulley groove. If needed, move the tensioner arm again to get the belt onto the last pulley. Reconnect the tension rod, install the locking pin, and put the belt shields back on before reinstalling the deck.
Safety Warning: This system uses a powerful spring. Be extremely careful when detaching the tension rod. Wear eye protection and control the movement of the tension arm to prevent it from snapping back unexpectedly.
How to Find Your John Deere Deck Size?
Not sure if your mower has a 42-inch, 48-inch, or 54-inch deck? Here are a few easy ways to check.
- Check the Deck Sticker: Most John Deere mower decks have the deck size printed on a sticker, such as “EDGE 42.”
- Check Your Mower Model: Your model number can give you a good idea. For example, the D140 usually comes with a 48-inch deck. However, some models were sold with different deck options, so don’t rely on the model number alone.
- Check the Deck Serial Number: Every mower deck has its own Product Identification Number (PIN). You can usually find the tag on the top or side of the deck. Use the PIN to look up the exact deck model and size.
- Measure the Cutting Width: If you’re still not sure, measure the cutting width. Measure from the tip of the left outside blade to the tip of the right outside blade. Don’t measure the metal deck itself. The measurement should be close to 42, 48, or 54 inches.
Signs Your Deck Belt Needs Replacing
If you notice any of these signs, it’s time to swap out your deck belt:
- Cracks or Frayed Edges: Check the belt for cracks, frayed edges, exposed cords, or shiny spots. These are signs that the belt is worn out.
- Poor Cutting Performance: If the grass looks uneven or you keep seeing strips of uncut grass, the belt may be slipping and the blades may not be spinning at full speed.
- Squealing Noise: A squealing or chirping noise when you engage the blades often means the belt is worn or loose.
- Too Much Vibration: A worn or damaged belt can make the mower deck vibrate more than normal.
- The Belt Keeps Coming Off: If the belt keeps coming off the pulleys, it may be stretched or worn out and should be replaced.
Final Thoughts
Using the correct John Deere mower deck belt diagram and part number makes the job much easier. If you need a deck belt or other aftermarket John Deere mower parts, FridayParts offers a wide selection of aftermarket parts for John Deere and many other brands. Find the right part quickly and get your mower back to work.
