

The drive belt (also called the transmission belt or hydraulic belt) transfers power from the engine to the hydrostatic transmission, which drives the lawnmower’s wheels. If you’re looking for the belt that drives the blades, you’ll need to refer to the deck belt diagram, as its routing differs from the drive belt. We’ve put together Toro TimeCutter drive belt diagrams and step-by-step replacement guides for the most common models.
Toro TimeCutter 42 Drive Belt Diagram
Many people search for drive belt diagrams by deck size, such as 42 inches. However, the drive belt routing depends on the frame design and mower model, not the deck size. Below are two common 42-inch TimeCutter models with different drive belt layouts.
Toro TimeCutter Z4200 Drive Belt Diagram
The Toro TimeCutter Z4200 uses a specific transmission layout that dictates its unique belt path. As shown in its parts diagram, this system uses two V-groove idler pulleys to guide and tension the belt.
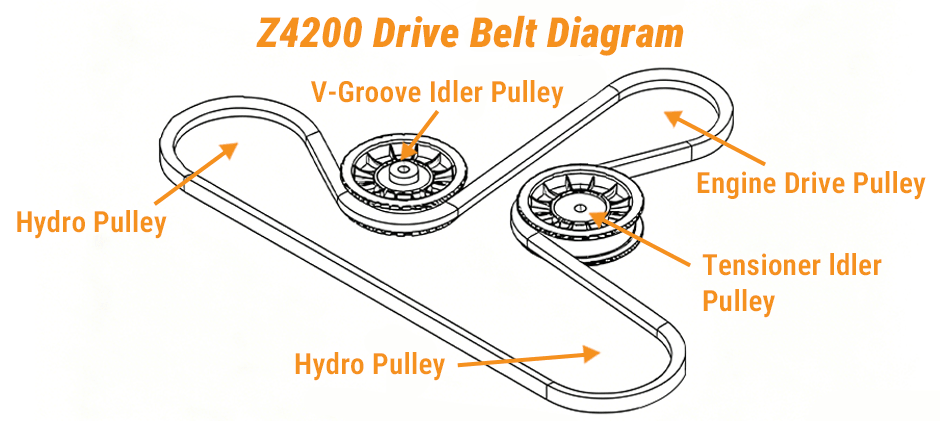
The V-belt in this system connects several key components:
- Engine Drive Pulley: Mounted on the engine crankshaft, this pulley powers the entire drive system, turning the belt.
- Hydro Pulleys: These are the two large pulleys located on top of the right-hand (RH) and left-hand (LH) hydrostatic transmissions. The belt drives each transmission independently, allowing for move and zero-turn control.
- Fixed V-Groove Idler Pulley: This is a stationary idler pulley that the inside (V-groove side) of the belt wraps around. Its purpose is to guide the belt and maintain the correct angle of approach to the hydro pulleys.
- V-Groove Tensioner Idler Pulley: This pulley is also a V-groove idler, but it is mounted on a pivoting arm (Arm-Idler). A spring (Spring-Idler) pulls this arm, causing the pulley to pull the belt inward, maintaining constant tension throughout the system. Unlike other designs that press on the back of the belt, this tensioner engages the inside (V-side) of the belt.
Toro TimeCutter SS4225 Drive Belt Diagram
Although the TimeCutter SS4225 has a 42-inch deck, its drive belt routing is different. The same routing is also used on several other TimeCutter models, including some with larger decks.
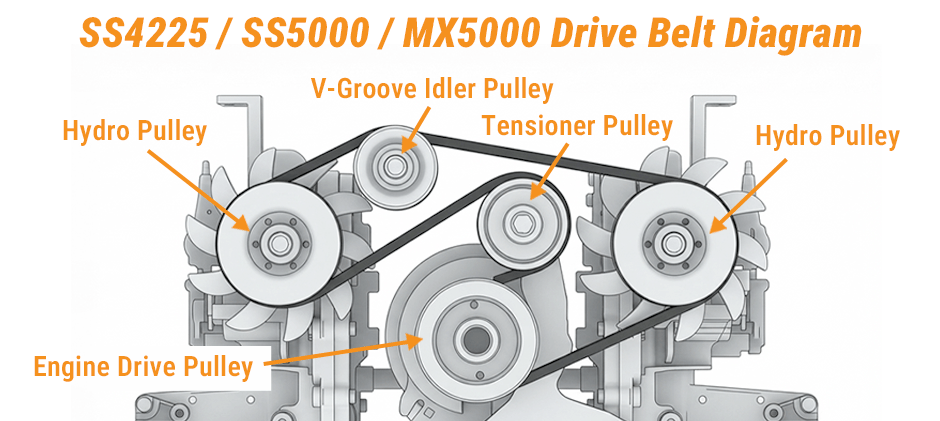
Here’s how the pulleys work together in this system:
- Engine Drive Pulley: This is the main pulley connected to the engine that drives the belt.
- Hydro Pulleys: These two large pulleys drive the left and right hydrostatic transmissions. On many SS models, these pulleys also have cooling fins to help reduce heat during operation.
- V-Groove Idler Pulley: This stationary pulley guides the belt by contacting its inside (V-side). It helps keep the belt running on the correct path between the engine drive pulley and the hydro pulleys.
- Flat Idler Pulley (Tensioner): This pulley is mounted on a spring-loaded arm and presses against the outer (flat) surface of the belt. It applies constant tension, keeping the belt tight and preventing it from slipping off the other pulleys.
Toro TimeCutter 50 Drive Belt Diagram
You might think the 50-inch TimeCutter models use a different drive belt layout. In fact, the drive belt routing is based on the mower’s series and chassis, not the deck size. As a result, many 50-inch models share the same drive belt diagram as the 42-inch SS4225.
Toro TimeCutter SS5000 Drive Belt Diagram & Toro TimeCutter MX5000 Drive Belt Diagram
The Toro TimeCutter SS5000 and MX5000 use the same drive belt routing. In fact, it’s the same belt layout used on the SS4225 shown above.
If you own either model, simply use the SS4225 diagram and belt routing description. Since the drive belt layout is based on the mower’s series and chassis rather than deck size, the same routing is used across all three models.
How to Replace a Toro TimeCutter Drive Belt?
Replacing the drive belt isn’t hard if you do it step by step. The difficulty is routing the new belt through the tight space. For safety first: unplug the spark plug wire and set the parking brake before you start.
- Access the Belt: You will access the belt from the rear of the mower. Remove the heat shield or belt guard to get a clear view and reach the pulleys.
- Release Belt Tension: Find the tensioner idler arm. Use a socket wrench or breaker bar on the center bolt of the tensioner pulley and rotate the arm against the spring to release the belt tension. Some people use a pry bar, but a wrench is usually easier and gives you better control.
- Remove the Old Belt: Once the tension is released, slide the belt off the pulleys. It’s usually easiest to remove it from one of the hydro pulleys or the tensioner pulley first. Pay attention to the belt routing as you remove it.
- Route the New Belt: This is the most important step. A common mistake is not seating the belt correctly on the engine drive pulley, which can be hard to see. Start by making sure the belt sits fully in the groove of the engine drive pulley. Then route it around the two hydro pulleys and the fixed idler pulley. Finally, pull back the tensioner arm and slip the belt over the tensioner pulley.
- Check the Belt and Test the Mower: Make sure the belt is fully seated on every pulley and follows the correct routing. Slowly release the tensioner arm so the spring tightens the belt. Reconnect the spark plug wire, start the mower, and make sure the drive system works properly.
What Are Signs of a Failing Drive Belt?
Drive belts don’t last forever. Heat, friction and constant tension wear them down over time. Watch for these warning signs that yours needs replacing:
- Weak Drive Performance: Your mower feels slow, bogs down going uphill, or barely moves—usually the belt is slipping.
- High-Pitched Squeaks or Chirps: A loud squeal when you hit the drive lever almost always means the belt is slipping or out of alignment.
- Clear Visible Wear: Check the belt for cracks, shiny hard glazed spots, frayed edges, or missing rubber chunks. Any damage at all = swap it out.
- Weird Shaking: A worn, bumpy belt makes the whole mower vibrate badly while you’re running it.
- Belt Keeps Popping Off: If the belt’s stretched out, it won’t sit tight and will slip off the pulleys over and over.
Summary
All the diagrams of models we noticed above are Toro zero turn drive belt diagrams. With the right diagram and steps, replacing a worn belt is a simple job you can do yourself. When it’s time to replace it, FridayParts offers reliable aftermarket drive belts. Just make sure you match the correct model and follow the proper routing so your Toro mower can get back to work.
