

If your Troy-Bilt Bronco riding mower has stopped moving or is struggling to gain speed, a worn or broken drive belt is one of the most common culprits. This guide is here to help. We will provide a detailed Troy-Bilt Bronco drive belt diagram and a step-by-step replacement process.
42-inch Troy-Bilt Bronco Drive Belt Diagram
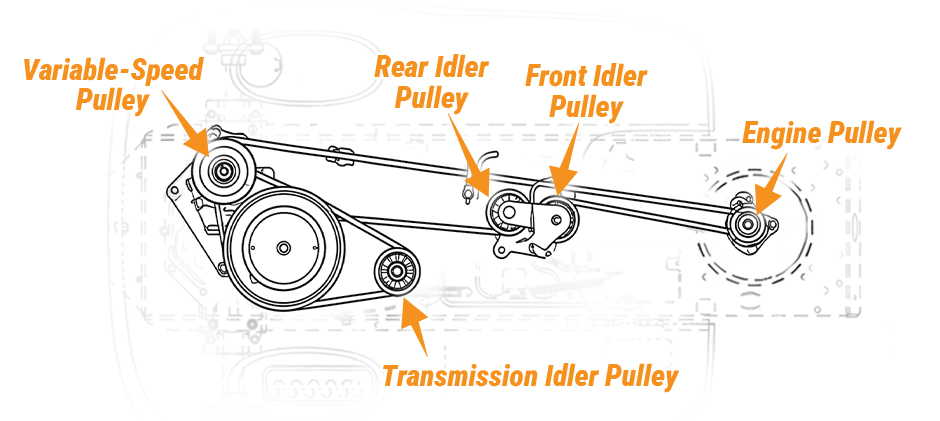
If you want to work on your mower properly, you need to know how the belts run and which parts they connect to. The 42‑inch Troy‑Bilt Bronco runs on a two‑belt setup for its automatic transmission. These two belts send power from the engine out to the mower wheels. We’ll go over what each belt does and which pulleys keep them lined up, just like you see in the diagram.
You have two main belts here: the lower drive belt, also called the variable‑speed belt, and the upper drive belt, sometimes named the transmission or secondary belt.
Lower Drive Belt
This is the longer belt of the pair. It moves power straight from the engine pulley to the variable‑speed pulley. The front idler pulley helps guide it along its path, and small belt keepers plus keeper pins hold it in position. Those little metal tabs and pins are really important — they stop the belt from jumping off the pulleys while you mow. The variable‑speed pulley is built smart. It has two grooves, and its working size shifts when you change your speed. That’s how your mower speeds up and slows down smoothly.
Upper Drive Belt
This one is shorter and thicker. It picks up power from the variable‑speed pulley and passes it to the transmission idler pulley, which spins the mower’s transaxle. The rear idler pulley adds tension to this belt, and that pulley sits on the double idler bracket. When you push the drive pedal, this whole assembly shifts. It tightens or loosens the belt so the transmission kicks in, and your mower moves forward or backward.
People often call both of these automatic transmission belts. Knowing how this two‑belt system is laid out will make your repair work much easier.
How to Replace a Drive Belt on a Troy-Bilt Bronco Lawn Mower?
Follow these simple steps to replace the drive belts on your Troy-Bilt Bronco mower. Pro tip: Take photos with your phone at every step as you take parts apart. This helps you remember exactly how everything goes back together.
Preparation and Safety First
Before starting any work, safety is your top priority.
- Park the mower on a flat, level surface.
- Engage the parking brake to prevent any movement.
- Turn the mower off and remove the key.
- Disconnect the spark plug wire to prevent the engine from accidentally starting.
- Disconnect the battery, starting with the negative terminal first to avoid short circuits.
1. Remove the Mower Deck
You have to remove the deck first to get to the drive belts. Lower the deck all the way down to its lowest position. Disconnect the PTO cable, pull out the retaining pins on the deck support brackets, then slide the deck out from under the mower.
2. Access the Belts
You can technically change the belts with the body panel on, but it’s way easier to take it off. Removing it gives you full, clear access to all pulleys and brackets.
3. Remove the Old Belts
- Lower Belt: Find the stationary idler pulley that tensions the upper belt. Use a 9/16-inch wrench to loosen its center nut. This lets the pulley pivot, creating enough slack to slip the lower belt off the engine pulley and the top groove of the variable-speed pulley.
- Upper Belt: Keep the parking brake engaged — this keeps slack in the lower belt. Remove the bolt that holds the rear idler pulley in place. This frees up the pulley assembly, so you have enough room to work the upper belt off the bottom groove of the variable-speed pulley and the transmission idler pulley. Carefully work the belt out from around all the belt keepers
4. Install the New Belts
- Install the lower belt first: Run the new lower belt around the transmission pulley and the bottom groove of the variable-speed pulley. Make sure it sits inside all belt keepers and stays on the correct side of the belt divider. Bolt the rear idler pulley back into place.
- Install the upper belt next: Route the new upper belt around the engine pulley and the top groove of the variable-speed pulley, then loop it around the front idler pulley. Once the belt is fully seated, tighten the stationary idler pulley back down to set the proper belt tension
5. Reassembly and Testing
Once both belts are correctly installed and tensioned, reassemble everything in the reverse order of removal. Reinstall the body panel, reconnect the seat safety switch, and secure the battery (positive terminal first). Reinstall the mower deck. Finally, reconnect the spark plug wire.
Start the mower and test the drive system. It should engage smoothly without jerking. When you release the drive pedal, the mower should come to a complete stop.
When Should You Replace a Drive Belt?
It’s never fun when a belt breaks right in the middle of your work. Staying on top of routine checks helps you avoid this hassle. Take a look at your drive belts every so often, and replace them out if you spot any of these issues:
- Obvious wear and damage: Check for cracks, frayed edges, shiny glazed spots, or pieces broken off the belt. That shiny glazed surface means the belt is slipping and can’t hold tight against the pulleys anymore.
- Weak performance: If your mower fights going up slopes or runs way slower than normal, your belts are probably slipping. They can’t pass full engine power over to the wheels.
- Jerky, uneven movement: A worn‑out belt catches and slips at random. This makes the mower lurch or move in a choppy way.
- High‑pitched squeals or chirps: When you hit the drive pedal and hear loud squeaking, that’s a common sign your belt is loose or worn and sliding on the pulley.
- Burning rubber odor: This is a major red flag. The belt slips with heavy friction and gets hot enough to burn. Shut your mower down right away and check the belts if you smell this.
Summary
Replacing the drive belts on your Troy-Bilt Bronco is important routine maintenance, and any handy owner can do it yourself. Use the Troy-Bilt Bronco drive belt diagram to learn how the setup works, follow the step-by-step replacement process, and watch for warning signs that your belt is going bad. This will help your mower run smoothly for a long time. FridayParts sells reliable parts at great prices, so you can grab what you need and get back to mowing fast.
