

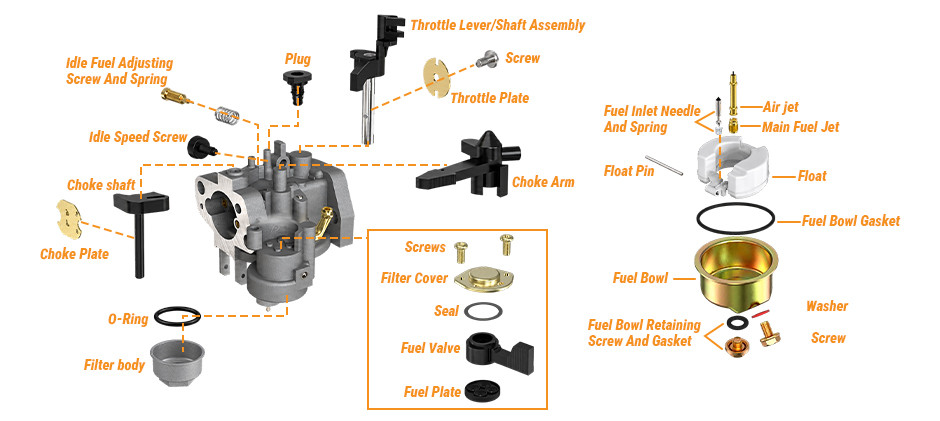
Here’s what happens without a diagram: hours wasted, and usually a flooded engine or a leaking bowl to show for it. A good Troy-Bilt carburetor diagram shows every jet, gasket, screw, and linkage point in the order they come apart. That’s what turns cleaning, rebuilding, or replacing parts into a confident job. In this guide, we take you through the float-type carburetor found across Troy-Bilt mowers, riding tractors, snow blowers, and tillers. Every component is labeled, the linkage is walked through, and the fixes for the most common running problems are all here.
Engines and Carburetors You Will Meet
Troy-Bilt mounts float-style carburetors on nearly every four-stroke machine in the lineup. Knowing which engine sits on your frame tells you which rebuild kit, bowl gasket, and jet size to order.
| Machine Type | Common Models | Typical Engine |
|---|---|---|
| Walk-behind mowers | TB110, TB200, TB230 | Briggs 550EX, 625EX, Powermore 159cc |
| Riding tractors | Pony 42, Bronco, Super Bronco | Briggs Intek, Powermore 420cc, Kohler Courage |
| Zero-turn mowers | Mustang 42, Mustang Z | Kohler 7000, Kawasaki FR651 |
| Snow blowers | Storm 2410, Storm 2890 | Powermore 208cc, 272cc, 357cc |
| Tillers | Horse, Big Red, Pony tiller | Briggs 900 Series, Kohler Command |
All of these carburetors share the same basic layout. Once you can read one exploded view, you can service the rest.
Float-Type Diagram Breakdown
A float-style carburetor stacks from the top down. Follow this order when you disassemble, and reverse it on the way back. Snap a photo at each stage so you have a reference for reassembly.
Top Section: Air and Throttle Controls
- Idle Fuel Adjusting Screw and Spring meter fuel at low RPM
- Idle Speed Screw sets the throttle stop
- Throttle Plate and Shaft Assembly controls airflow volume
- Choke Plate and Choke Shaft restrict air for cold starts
- Choke Arm links to the governor or manual lever
The small brass plug on the top casting seals the idle circuit after factory calibration. Leave it alone unless you are doing a deep varnish removal.
Middle Section: Fuel Metering
This is where most running problems start. A clogged jet here causes surging, hunting, and hard starts.
- Main Fuel Jet feeds fuel at wide-open throttle
- Air Jet mixes air with fuel before it enters the venturi
- Fuel Inlet Needle and Spring open and close based on float height
- Float and Float Pin rise with fuel level to shut the needle
If the engine runs rich, inspect the needle seat for debris. If it runs lean, the main jet is probably clogged with varnish. A fresh carburetor rebuild kit with gaskets brings back proper sealing between these parts.
Bottom Section: Bowl and Mounting
- Fuel Bowl Gasket seals the bowl to the body
- Fuel Bowl holds the fuel reservoir
- Washer, Screw, and Retaining Gasket secure the bowl
A side-mounted fuel shut-off valve with filter cover, seal, and fuel plate appears on larger Powermore engines used in riding tractors and snow blowers. Clean the inlet screen whenever you drop the bowl.
Reading the Linkage Diagram
The linkage portion of the Troy-Bilt carburetor diagram is where most owners get stuck, so study it before removing any rods. Linkage confuses more owners than any other part of the carburetor. Snap a photo before you remove a single rod, and you save yourself an hour of guessing later.
Pony and Bronco Riding Tractor Linkage
The Pony 42 and Bronco run a single-cylinder engine with three rods:
- Governor rod connects the governor arm to the throttle lever
- Governor spring pulls the throttle open against engine load
- Choke link runs from the air box slide to the choke arm
Make sure the governor spring goes into the right hole on the throttle lever. Shift it just one hole, and you’ll change the governed RPM by 200–400 — enough to make the deck belt slip or the blades lose speed.
TB110 and TB200 Walk-Behind Linkage
Walk-behind mowers use a simpler two-rod setup:
- Z-bend end of the primary rod sits in the throttle plate hole
- Hook end rides in the governor arm slot
- A single return spring links the governor arm to the carburetor body
The throttle plate must snap fully closed when you release the bail. If it hangs open, the governor arm bushing is worn and needs a replacement governor arm kit.
Snow Blower and Tiller Linkage
Powermore engines on Storm series blowers and Horse tillers use a slightly longer governor rod with a plastic swivel at the throttle end. Check the swivel for cracks every spring. A broken swivel lets the throttle flop open and overspeed the engine, which chews through belts and auger shear pins.
Common Problems and Fixes
Most carburetor complaints trace back to five issues. Use the Troy-Bilt carburetor diagram to find each part before you order anything.
| Symptom | Likely Cause | Fix |
|---|---|---|
| Starts then dies | Clogged main jet | Soak jet in cleaner, blow out passages |
| Surges at idle | Dirty idle circuit | Pull Welch plug, clean pilot passages |
| Fuel leaks from bowl | Stuck float or torn gasket | Replace needle, seat, and bowl gasket |
| Won’t idle down | Worn throttle shaft | Install bushing kit or new carburetor |
| Floods on choke | Needle seat stuck open | Tap float gently, replace needle |
When to Rebuild Versus Replace
Rebuild if the body casting is clean, the throttle shaft has no play, and the jets come clear with carb cleaner. Replace the whole unit if:
- The throttle shaft wiggles side to side more than 1/32 inch
- Ethanol has corroded the bowl mounting threads
- The venturi shows white powder that will not scrub off
- You have already rebuilt it twice in two seasons
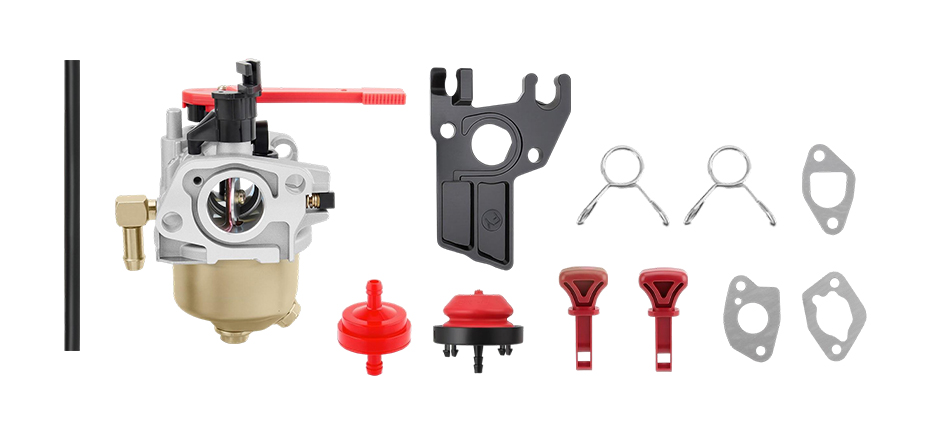
A new complete carburetor assembly often costs less than two rebuild kits plus your time, and comes with fresh gaskets, jets, and a float already set to spec.
Ethanol Damage on Stored Equipment
Snow blowers that sit all summer and tillers that sit all winter take the worst beating from ethanol-blended fuel. The alcohol absorbs moisture, then eats the zinc in the bowl and the brass in the main jet. Signs of ethanol damage include:
- Green or white crust around the bowl nut threads
- A gummy brown film inside the float chamber
- Pinhole leaks on the bottom of the bowl
Before you put it away for a long stretch, either drain the fuel system or add a stabilizer that’s rated for ethanol fuel. Another good habit: run a gallon of fresh non-ethanol fuel through the carburetor first — it flushes out most of the residue that causes trouble.
Cleaning Steps That Actually Work
Soaking in generic cleaner rarely clears a varnished main jet. Follow this sequence instead.
- Drain fuel and remove the bowl
- Unscrew the main jet and bowl nut
- Soak metal parts in carburetor dip for 20 minutes
- Blow every passage with compressed air from both directions
- Run a strand of copper wire through the main jet, never steel
- Replace all gaskets, even ones that look fine
- Set float height to the spec in your engine manual
Float height on most Troy-Bilt Powermore engines sits parallel to the body gasket surface when the carburetor is inverted. Briggs engines usually spec a 1/8-inch gap between the float and the bowl rim. Check your engine manual for the exact number before you bend the tab.
Tools That Make the Job Easier
- Carburetor dip bucket with mesh basket
- Set of jet cleaning wires in multiple diameters
- Small torque wrench for the bowl nut
- Fresh carburetor mounting gasket set for the intake flange
- Fuel-resistant thread sealant for the main jet plug
A clean bench and a magnetic tray for small parts prevent lost springs and screws. Lay out the components in the order they came off the engine, so reassembly follows a clear path.
Final Notes
A clear Troy-Bilt carburetor diagram is the difference between a frustrating repair and a one-afternoon job. Before you unhook anything, match the carburetor to the right engine and label the linkage. During a rebuild, replace every soft part. When you need new parts, FridayParts stocks aftermarket carburetors, rebuild kits, gaskets, and linkage springs for Troy-Bilt mowers, riding tractors, snow blowers, and tillers — all priced well below dealer rates.
