

Replacing your chain and forgetting about the chainsaw chain direction during installation? Don’t worry. It is as simple as figuring out the direction your chainsaw teeth face. That means making sure the teeth are facing toward the bar tip on the top of the bar. In this guide, we’ll give you simple, clear steps to install your chainsaw chain correctly every time.
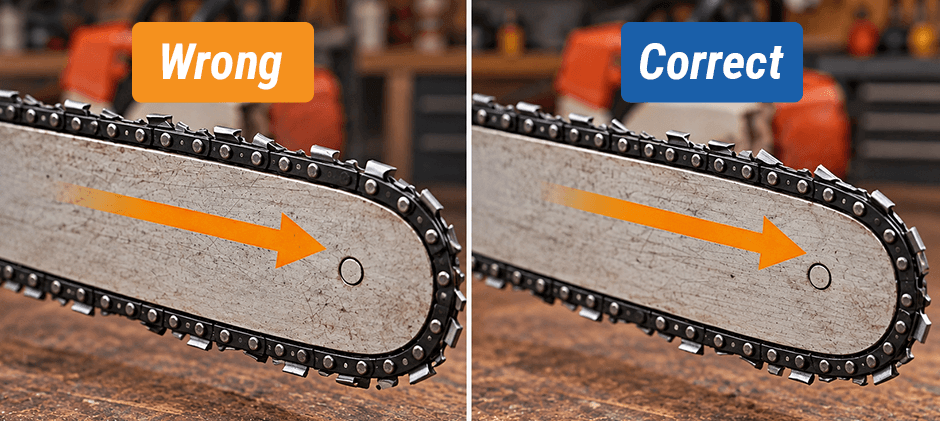
Correct Chainsaw Chain Direction
- On the Top of the bar, the cutting teeth must point forward toward the bar tip
- On the bottom of the bar, the cutting teeth point back toward the powerhead
If the top teeth point toward the saw body, the chain is installed backward.
Why Correct Chainsaw Chain Direction Matters?
Installing your chainsaw chain in the correct direction ensures a cooler chain and stable, smooth cuts. If the chain is installed backward, it can introduce many undesirable results.
- Slow your cutting
- Overheat your chain
- Produce fine sawdust instead of chips
- Increase the risk of kickback
A backward chain is often reported as the main culprit of “chainsaw not cutting” issues.
What Direction Do Chainsaw Teeth Face?
Many guides may tell you the teeth only need to face “up”. That’s not enough.
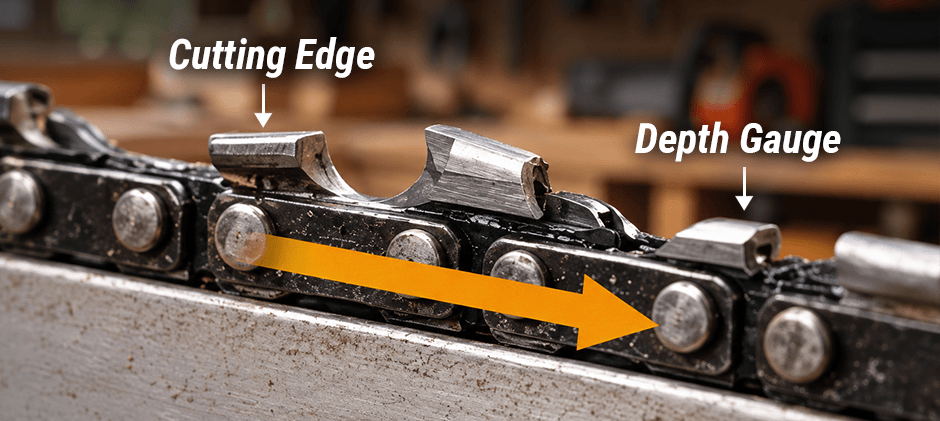
It’s a must to check the sharp cutting edge of each tooth.
On top of the bar, the sharp edge should face forward, as if it is ready to bite into the wood. The depth gauge (raker) sits just in front of the cutting edge.
Here is a simple rule:
If your chain tooth looks like it’s running away from the saw body on the top of the bar, you’ve got the right correction.
How to Check the Chainsaw Chain Direction?
You can identify the direction in less than 30 seconds; no need to remove anything.、
- Look at the top of the bar
- Find the cutting teeth
- Confirm the sharp edge points toward the bar tip
- Otherwise, the chain is backward
For certain chains, there are small arrows on the links, which always show the correct rotation direction for you.
Easy Steps to Install Your Chainsaw Chain
Understanding which way your chain should go on your chainsaw, it’s time for the DIY installation. Here are simple steps to install the chainsaw.
- Safety first: Turn off your chainsaw, remove the battery or unplug (electric), or let the engine cool (gas) and wear gloves.
- Remove the side cover: Loosen the bar nuts or quick-release knob and remove the side cover
- Loosen chain tension: Turn the tension screw counter-clockwise to loosen the chain
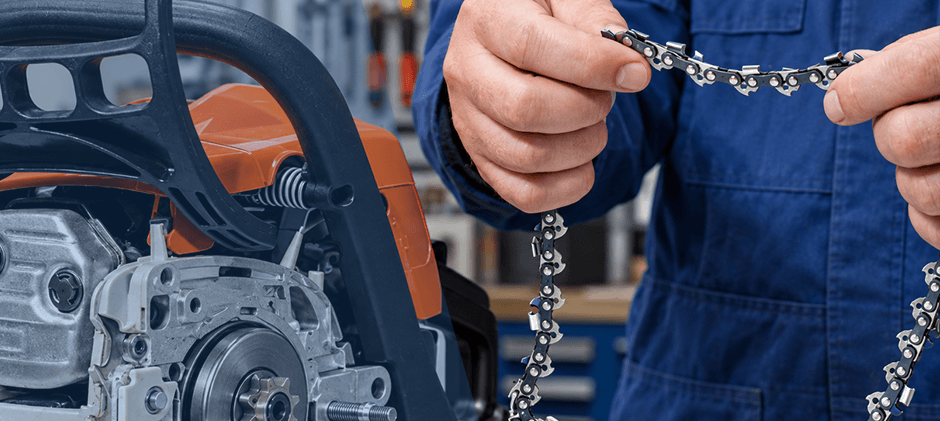
- Install the chain: Loop the chain around the drive sprocket, place the drive links into the guide bar groove and make sure the teeth are facing toward the bar tip on the top of the bar
- Adjust the tension: For proper tension, make sure the chain fits snugly on the bar. Check the chain tension by pulling it by hand. If you have the right tension, the drive links do not fully leave the groove and the chain snaps back into place when released.
- Tighten cover and final check: Reinstall the side cover, tighten the nuts and turn the chain by hand one full rotation. You must feel it should move smoothly with no binding.
When Should You Change the Chain?
You don’t have to worry about getting your chain in the wrong way if you never change the chain. Generally, the chainsaw blade can be sharpened with a Dremel or with a file. Here is a complete guide on how to sharpen your chainsaw with a file.
If you find yourself applying more force than usual during cutting or if the cuts appear rough and uneven, it signals a time for sharpening.
If you have to push harder than usual to cut, or if the cuts look rough and uneven, it’s time to sharpen. So when would you ever change out the chain of your chainsaw?
Three common circumstances for the change:
- When the chain becomes dull to the degree where the edges can no longer be properly sharpened
- If you use carbide-tipped blades, you might need to remove the chain for blade sharpening
- If your chain unfortunately breaks and replacing the chain is far more cost-effective than the whole chainsaw replacement
Potential Risks of Wrong Chainsaw Chain Direction
Getting your chainsaw chain in the wrong way can bring about many potential problems:
- Chain link damage: If the chain links run in the wrong direction, it can cause damage to the chain. If the drive link hasn’t been fixed properly, it can lead to further damage as well.
- Clutch burnout: A wrong chain direction can lead to clutch burnout, as the chain is not cutting the material.
- Deteriorating motor: You will have to press down on the wood even harder if the chain is not facing the right direction. This puts more pressure on the motor and makes it start to deteriorate and even burn out.
- Guide bar stress: The guide bar may suffer considerably more stress due to the wrong chain direction. That means damage to the guide bar when the chain is not in the correct direction.
- Wasted bar oil: The wrong chain direction can cause bar oil to spray out during operation. In other words, you’ll waste a lot of bar oil when you have the chain on in the wrong direction.
The wrong chain direction can pose risks and reduce the lifespan of your chainsaw. So, next time you realize something is wrong, check your chainsaw chain to see if it is in the wrong direction to avoid costly repairs.
Final Words
Having your chain in the wrong direction can compromise your cutting. You should catch it within the first few seconds and flip the chain to avoid damage. When you feel it’s unusual, look at the top of the bar. If the sharp cutting edges face the engine instead of the bar tip, your chain is backward. If you’ve got the wrong direction and unfortunately damage your chainsaw, FridayParts offers a vast selection of quality chainsaw replacement parts to get it back to its optimal performance.
